Volume: resize
Resize a volume
Users are able to increase in size any of their volumes. This operation can be done either via Horizon Dashboard or via Command Line Interface.
Important
It is not possible to decrease the size of the volume (the volume can only be extended).
The operations change depending on whether the volume to be resized is a primary volume (like the root volume of a bootable VM) or secondary volume.
In order to perform the resize operation of a primary volume (e.g. the root disk of a bootable VM), it is strongly recommended shuting down the VM and it is mandatory to delete the instance attached to the volume.
It is possible to ensure that the volume will not be deleted togheter with the instance to which is attached, by verifying that the volume’s Delete On Termination property is set to False. This flag is only visible via command line:
First of all identify the ID of the bootable VM with:
$ openstack server list
+----------------+------------------+--------+-----+--------------------------+------------------+
| ID             | Name             | Status | ... | Image                    | Falvor           |
+----------------+------------------+--------+-----+--------------------------+------------------+
| <Server-ID-01> | <Server-Name-01> | ACTIVE |     | N/A (booted from volume) | <Flavor-Name-01> |
| <Server-ID-02> | <Server-Name-02> | ACTIVE |     | <Image-Name-01>          | <Flavor-Name-02> |
| <Server-ID-03> | <Server-Name-03> | ACTIVE |     | <Image-Name-02>          | <Flavor-Name-03> |
...
| <Server-ID>    | <Server-Name>    | ACTIVE |     | <Image-Name>             | <Flavor-Name>    |
+----------------+------------------+--------+-----+--------------------------+------------------+
Then, visualize the details of the volume attached to the instance as follows:
$ openstack server volume list <Server-ID>
+----------+---------------------------+------+------------------------+-----------------+-------------------------+
| Device   | Server ID   | Volume ID   | Tag  | Delete On Termination? | Attachment ID   | BlockDeviceMapping UUID |
+----------+-------------+-------------+------+------------------------+-----------------+-------------------------+
| /dev/vda | <Server-ID> | <Volume-ID> | None | False                  | <Attachment ID> | <UUID>                  |
+----------+-------------+-------------+------+------------------------+-------------------------------------------+
In case, that the volume’s Delete On Termination property is set to True, it can be changed via the following command:
$ openstack server volume set --preserve-on-termination <Server-ID> <Volume-ID>
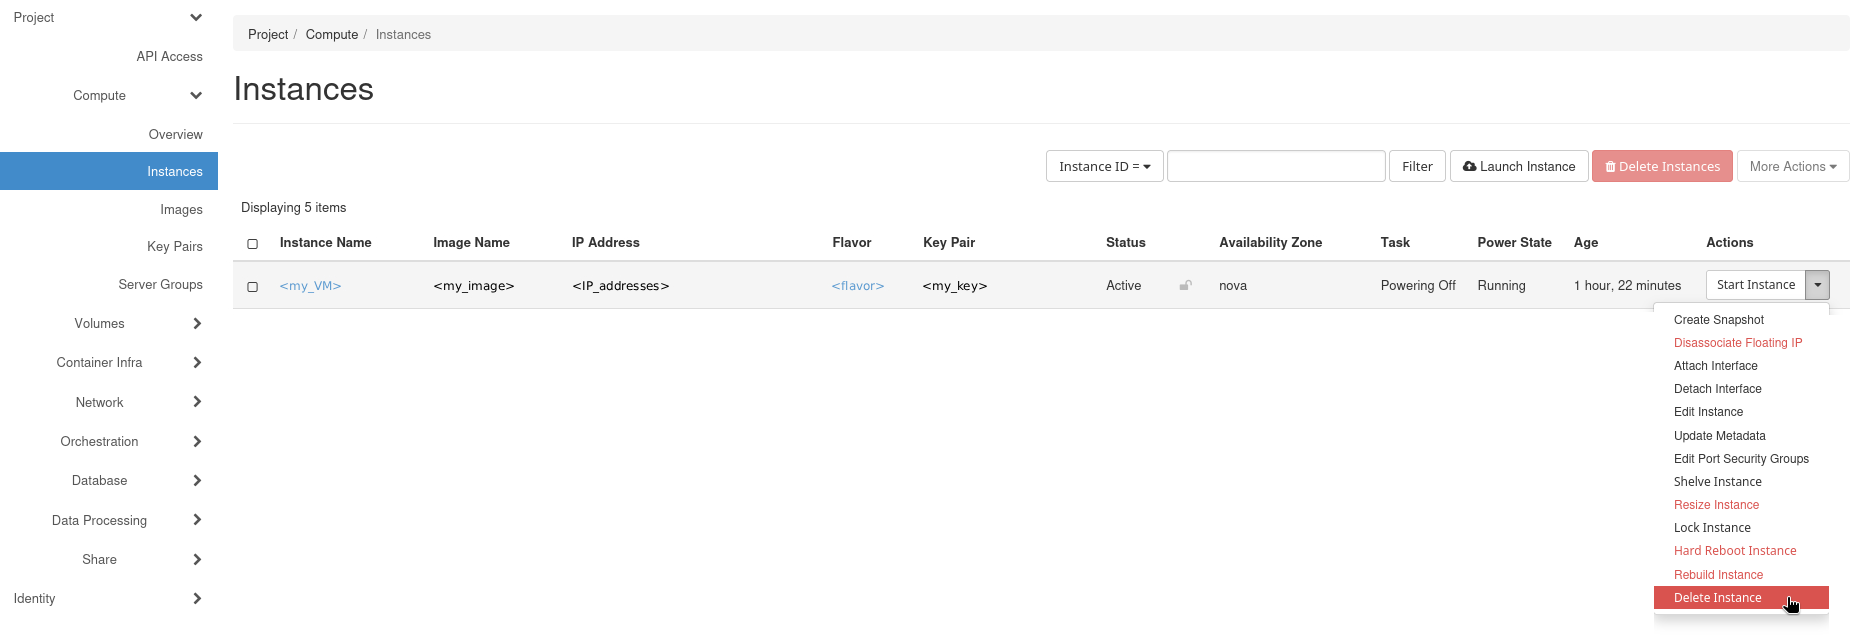
Delete the instance
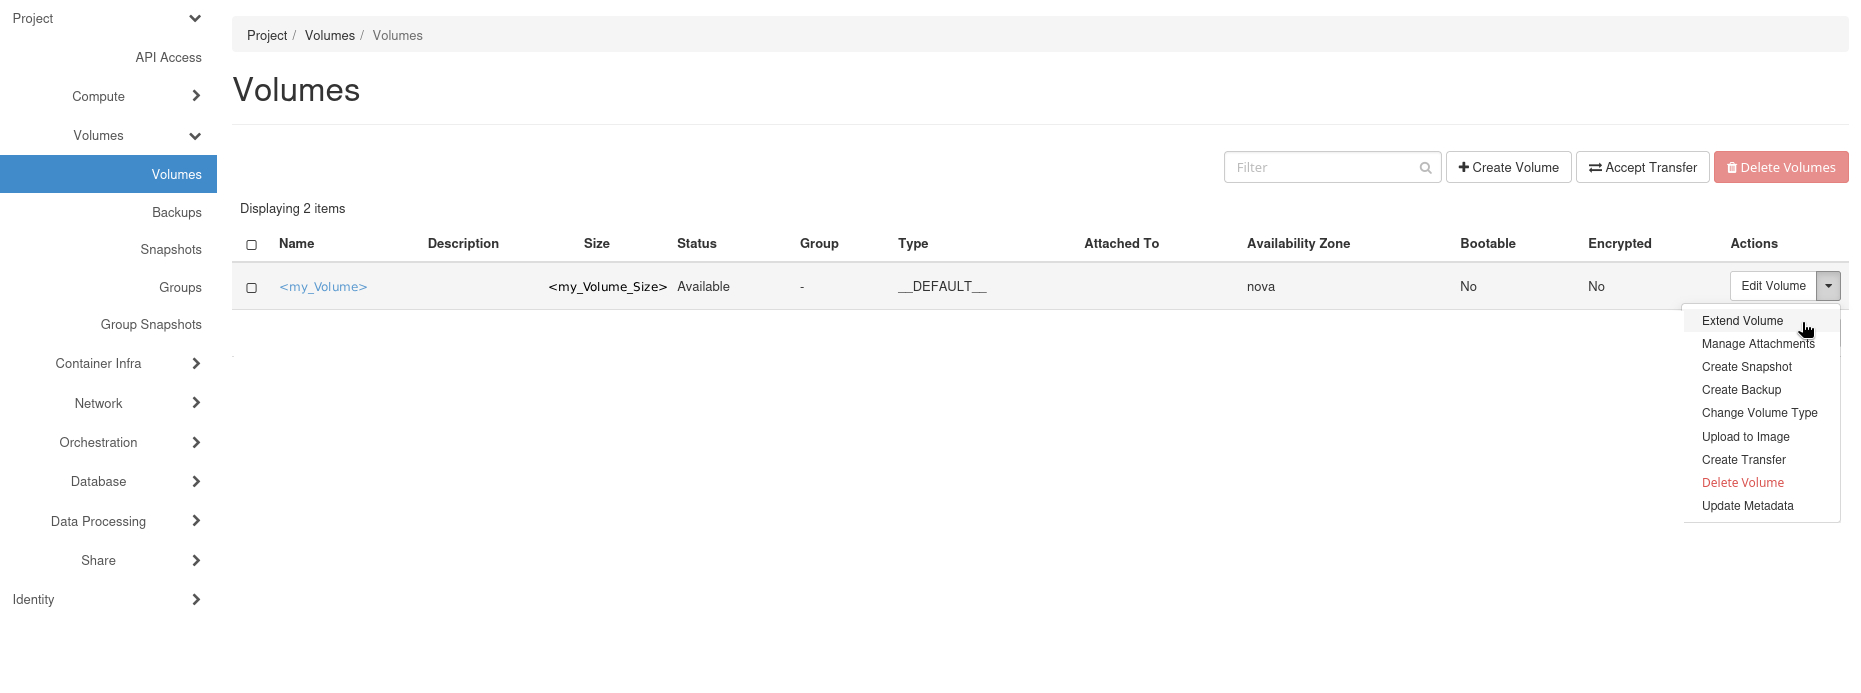
Navigate to the “Volumes” tab and proceed to resize the volume by selecting the action “Extend Volume”.
In the pop-up window that opens, you can select the New Size.
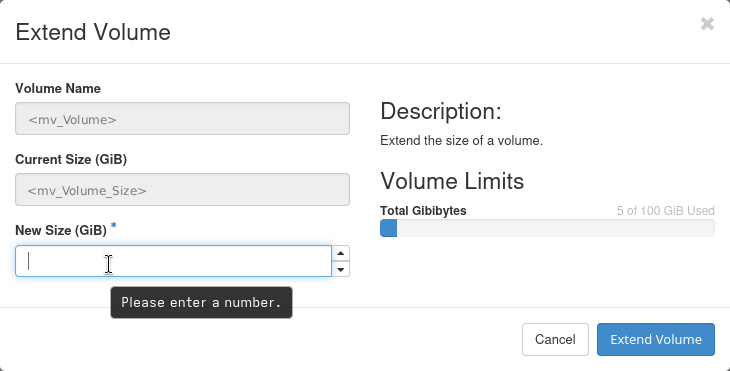
After entering the new size, click on “Extend Volume” button.
First, list the servers and the volumes to identify the IDs of the bootable VM.
$ openstack server list
+----------------+------------------+--------+-----+--------------------------+------------------+
| ID             | Name             | Status | ... | Image                    | Falvor           |
+----------------+------------------+--------+-----+--------------------------+------------------+
| <Server-ID-01> | <Server-Name-01> | ACTIVE |     | N/A (booted from volume) | <Flavor-Name-01> |
| <Server-ID-02> | <Server-Name-02> | ACTIVE |     | <Image-Name-01>          | <Flavor-Name-02> |
| <Server-ID-03> | <Server-Name-03> | ACTIVE |     | <Image-Name-02>          | <Flavor-Name-03> |
...
| <Server-ID>    | <Server-Name>    | ACTIVE |     | <Image-Name>             | <Flavor-Name>    |
+----------------+------------------+--------+-----+--------------------------+------------------+
Identify the volume ID used as boot source for the VM.
$ openstack server volume list <Server-ID>
+----------+---------------------------+------+------------------------+-----------------+-------------------------+
| Device   | Server ID   | Volume ID   | Tag  | Delete On Termination? | Attachment ID   | BlockDeviceMapping UUID |
+----------+-------------+-------------+------+------------------------+-----------------+-------------------------+
| /dev/vda | <Server-ID> | <Volume-ID> | None | False                  | <Attachment ID> | <UUID>                  |
+----------+-------------+-------------+------+------------------------+-------------------------------------------+
Remove the instance
$ openstack server delete <Server-ID>
Resize the volume:
$ openstack volume set <Volume-ID> --size <New-Size-in-GB>
Once the volume has been resized, you can proceed in creating a new bootable VM using the newly sized volume as boot source: the detailed instruction on how to proceed are reported in the Instance: root disk resize page, “Bootable” tab.
If the volume is attached to a virtual machine instance, we strongly recommend shutting down the instance and detatching the volume before performing the operation. To detatch the volume, follow the steps in Attach/Detach a volume.
The resize operation can be performed both via the Horizon Dashboard and the OpenStack command line interface.
Make sure that the volume you want to resize is not attached to any instance. If it is attached, detach it following the steps in Attach/Detach a volume.

And select the volume you want to resize from the list.

Now you can proceed to resize the volume by selecting the action “Extend Volume”.
In the pop-up window that opens, you can select the New Size.
After entering the new size, click on “Extend Volume” button.
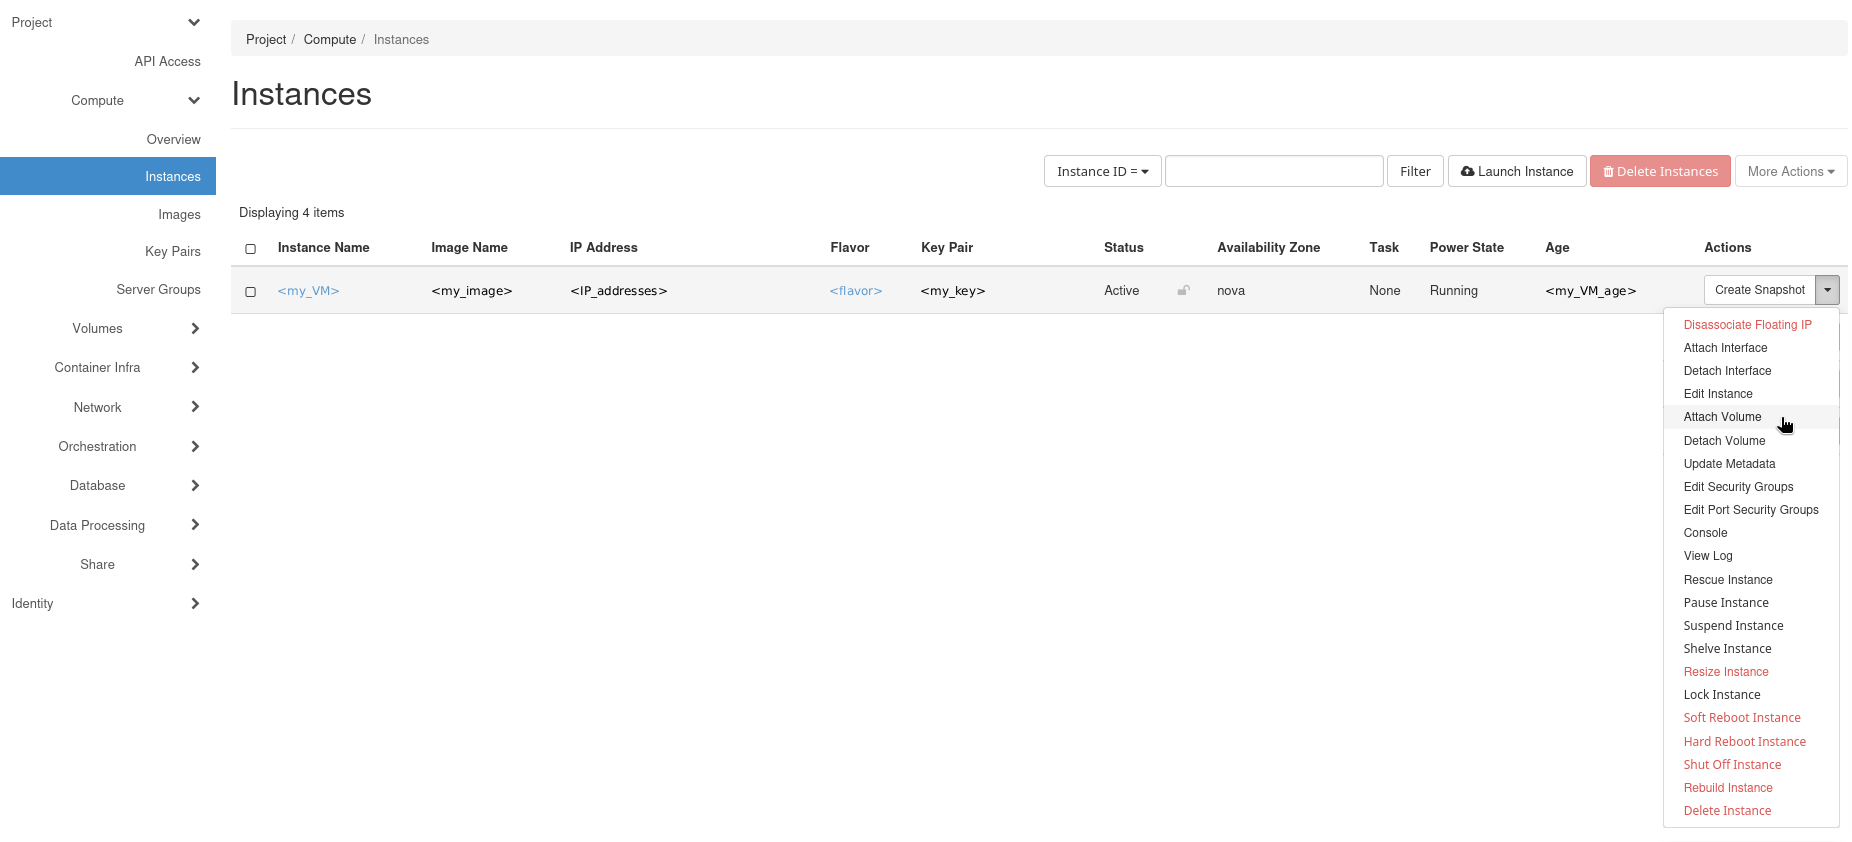
Once the volume has been resized, you can re-attach it to the instance using the Manage Attachments option.
First, list the servers and the volumes to identify the IDs of the resources.
$ openstack server list
+----------------+------------------+--------+-----+------------------+
| ID             | Name             | Status | ... | Flavor           |
+----------------+------------------+--------+-----+------------------+
| <Server-ID-01> | <Server-Name-01> | ACTIVE |     | <Flavor-Name-01> |
| <Server-ID-02> | <Server-Name-02> | ACTIVE |     | <Flavor-Name-02> |
| <Server-ID-03> | <Server-Name-03> | ACTIVE |     | <Flavor-Name-03> |
...
| <Server-ID>    | <Server-Name>    | ACTIVE |     | <Flavor-Name>    |
+----------------+------------------+--------+-----+------------------+
$ openstack volume list +----------------+------------------+----------+---------------------------------------+ | ID | Name | Status | Attached to | +----------------+------------------+----------+---------------------------------------+ | <Volume-ID-01> | <Volume-Name-01> | <status> | | | <Volume-ID-02> | <Volume-Name-02> | <status> | Attached to <Volume-Name> on /dev/vdX | | <Volume-ID-03> | <Volume-Name-03> | <status> | | ... | <Volume-ID> | <Volume-Name> | <status> | Attached to <Volume-Name> on /dev/vdX | +----------------+------------------+----------+---------------------------------------+Detach the volume from the instance (if it is attached):
$ openstack server remove volume <Server-ID> <Volume-ID>Resize the volume:
$ openstack volume set <Volume-ID> --size <New-Size-in-GB>Finally, you can re-attach the volume to the instance:
$ openstack server add volume <Server-ID> <Volume-ID>
+-----------------------+-------------+
| Field                 | Value       |
+-----------------------+-------------+
| ID                    | <Volume-ID> |
| Server ID             | <Server-ID> |
| Volume ID             | <Volume-ID> |
| Device                | /dev/vdX    |
| Tag                   | None        |
| Delete On Termination | False       |
+-----------------------+-------------+
After this, you can restart the instance.
Once these operations are done, OpenStack will assume the volume has the new size and it will appear to the machine as a device of a different size.
Important
It is necessary to update the device partitions and then the filesystem must be extended to occupy all the free space that has been created.
These operations depend on the operating system and the type of filesystem.
For example, on a Rocky Linux system, you can resize an ext4 filesystem using the tools fdisk, e2fsck, and resize2fs. During these operations, all precautions must be taken to avoid data loss; therefore, we suggest you perform the necessary checks and ensure you use the specific tools depending on the volume’s filesystem.
Refer to your operating system documentation for more details on resizing partitions and filesystems.
Example: extending a partition formatted with XFS filesystem on Ubuntu
As a reference, we provide here an example of extending a partition formatted with XFS filesystem on Ubuntu 24.04. We assume the volume has been already extended in OpenStack as shown above. We cannot cover all the combinations of OS and filesystems, so please refer to your OS documentation for the specific commands needed.
Important
These operations can lead to data loss if not done properly. Please ensure you have backups and understand the commands before executing them.
The following example assumes the volume is attached as /dev/sdb1 and is mounted in /data.
The volume has been resized from 250GB to 400GB in OpenStack.
Check file system space usage
ubuntu@vm:~$ df -h
Filesystem      Size  Used Avail Use% Mounted on
tmpfs            34G  1.5M   34G   1% /run
/dev/sda1        29G   25G  3.1G  90% /
tmpfs           166G  4.0K  166G   1% /dev/shm
tmpfs           5.0M     0  5.0M   0% /run/lock
/dev/sda16      881M  117M  703M  15% /boot
/dev/sda15      105M  6.2M   99M   6% /boot/efi
tmpfs            34G   20K   34G   1% /run/user/1000
/dev/sdb1       250G  188G   63G  76% /data    # <-- Filesystem to be extended
Show block devices and partitions
ubuntu@vm:~$ lsblk
NAME    MAJ:MIN RM  SIZE RO TYPE MOUNTPOINTS
sda       8:0    0   30G  0 disk
├─sda1    8:1    0   29G  0 part /
├─sda14   8:14   0    4M  0 part
├─sda15   8:15   0  106M  0 part /boot/efi
└─sda16 259:0    0  913M  0 part /boot
sdb       8:16   0  400G  0 disk               # <-- Volume is 400GB
└─sdb1    8:17   0  250G  0 part /data         # <-- Partition is still 250GB
Grow the partition to occupy all the new space
ubuntu@vm:~$ sudo growpart /dev/sdb 1
CHANGED: partition=1 start=2048 old: size=524285919 end=524287966 new: size=838858719 end=838860766
Verify partition resized
ubuntu@vm:~$ lsblk
NAME    MAJ:MIN RM  SIZE RO TYPE MOUNTPOINTS
sda       8:0    0   30G  0 disk
├─sda1    8:1    0   29G  0 part /
├─sda14   8:14   0    4M  0 part
├─sda15   8:15   0  106M  0 part /boot/efi
└─sda16 259:0    0  913M  0 part /boot
sdb       8:16   0  400G  0 disk
└─sdb1    8:17   0  400G  0 part /data         # <-- Partition was extended
Verify filesystem size
ubuntu@vm:~$ df -h
Filesystem      Size  Used Avail Use% Mounted on
tmpfs            34G  1.5M   34G   1% /run
/dev/sda1        29G   25G  3.1G  90% /
tmpfs           166G  4.0K  166G   1% /dev/shm
tmpfs           5.0M     0  5.0M   0% /run/lock
/dev/sda16      881M  117M  703M  15% /boot
/dev/sda15      105M  6.2M   99M   6% /boot/efi
tmpfs            34G   20K   34G   1% /run/user/1000
/dev/sdb1       250G  188G   63G  76% /data    # <-- Filesystem not yet updated
Grow the XFS filesystem
ubuntu@vm:~$ sudo xfs_growfs /data
meta-data=/dev/sdb1              isize=512    agcount=7, agsize=9830336 blks
         =                       sectsz=512   attr=2, projid32bit=1
         =                       crc=1        finobt=1, sparse=1, rmapbt=1
         =                       reflink=1    bigtime=1 inobtcount=1 nrext64=0
data     =                       bsize=4096   blocks=65535739, imaxpct=25
         =                       sunit=0      swidth=0 blks
naming   =version 2              bsize=4096   ascii-ci=0, ftype=1
log      =internal log           bsize=4096   blocks=19199, version=2
         =                       sectsz=512   sunit=0 blks, lazy-count=1
realtime =none                   extsz=4096   blocks=0, rtextents=0
data blocks changed from 65535739 to 104857339
Verify that the filesystem has been resized
ubuntu@vm:~$ df -h
Filesystem      Size  Used Avail Use% Mounted on
tmpfs            34G  1.5M   34G   1% /run
/dev/sda1        29G   25G  3.1G  90% /
tmpfs           166G  4.0K  166G   1% /dev/shm
tmpfs           5.0M     0  5.0M   0% /run/lock
/dev/sda16      881M  117M  703M  15% /boot
/dev/sda15      105M  6.2M   99M   6% /boot/efi
tmpfs            34G   20K   34G   1% /run/user/1000
/dev/sdb1       400G  191G  210G  48% /data    # <-- Expected result
As you can see, the partition and filesystem have been successfully resized to utilize the full 400GB of the volume. Also, in this specific case there’s no need to unmount the filesystem or stop the machine to perform the resize operation, but this may vary depending on the OS and filesystem type.
Important
There is a limit of 2TB for formatting volumes with the MBR partition table. If you need to create or resize a volume beyond this limit, you must use the GPT partition table.