Accessing any section of the Cineca HPC systems requires activating two-factor authentication (2FA) for each user account.
This enhanced security measure verifies a user’s identity by requiring a second, independent factor in addition to the account password.
Even if the correct account password is used, 2FA ensures that unauthorized access is prevented, significantly improving the system’s overall security.
This access modality operates seamlessly for users, who continue to utilize standard protocols such as the SSH client. Before connecting to the cluster, users must request an SSH certificate from our Identity Provider (IP) via the smallstep client.
Upon making the request, a web page will automatically open in the browser, prompting users to authenticate with our IP by entering a one-time password (OTP).
Following successful authentication, the server will issue a time-limited certificate valid for 12 hours.
This certificate allows users to connect to CINECA systems via SSH client.
Important
For the First-time Access and the activation of 2FA, a user must complete the following steps:
Sign in using your CINECA cluster username and password (received by email).
At first login, you’ll be prompted to verify your email, change your password, and configure your OTP (One-Time Password).
Important
New users will automatically receive the link. Once it is set up, you’ll use the OTP alongside your password for logging into the cluster.
If it’s your first time logging in and you haven’t received a valid access link, contact superc@cineca.it.
if you already have access to the cluster via username and password but you haven’t yet done your first login on the new sso portal and you haven’t configured the 2FA, you need to write at superc@cineca.it to receive a valid link for the access.
Step 2
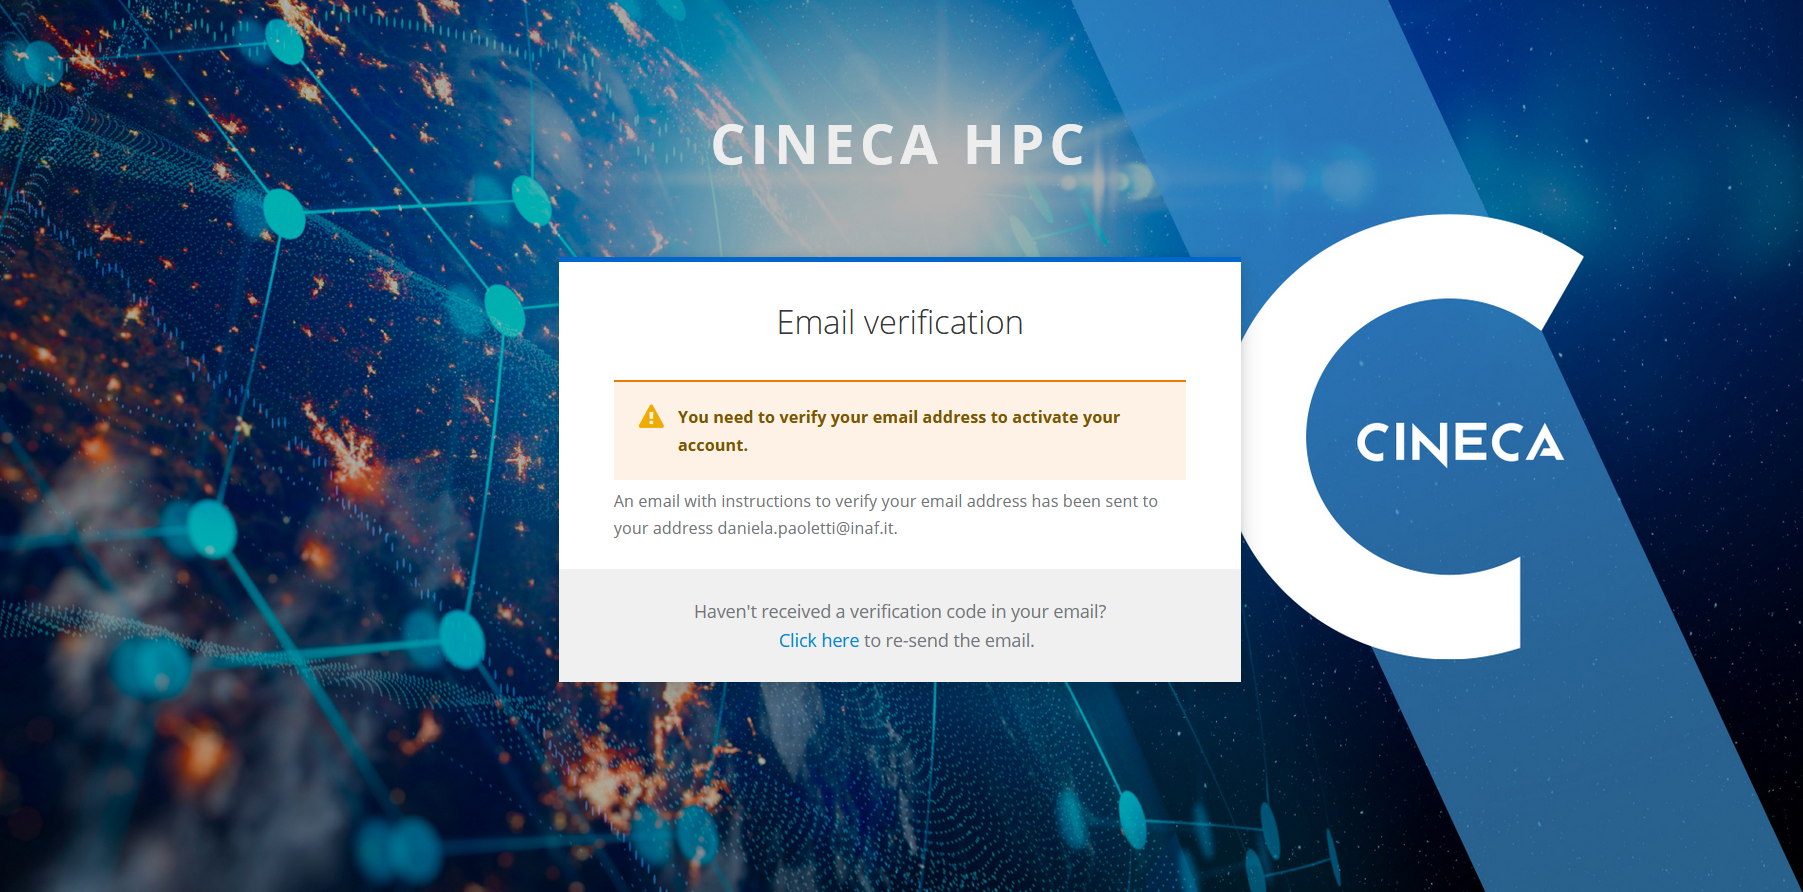
After your first login, you will receive an email from CINECA with the subject “CINECA HPC Single Sign-On: Verify Your Email.” This email will be sent to the address you registered with on the UserDB portal.
The email contains a verification link labeled Clickonthelinktoproceed. Once you click it, you will be prompted to define a new password. Please ensure that your chosen password complies with the Policy for HPC password definition.
Step 3
After the definition of a new valid password (that will replace the password used to login to CINECA clusters), you will be asked to configure the 2FA following few simple steps.
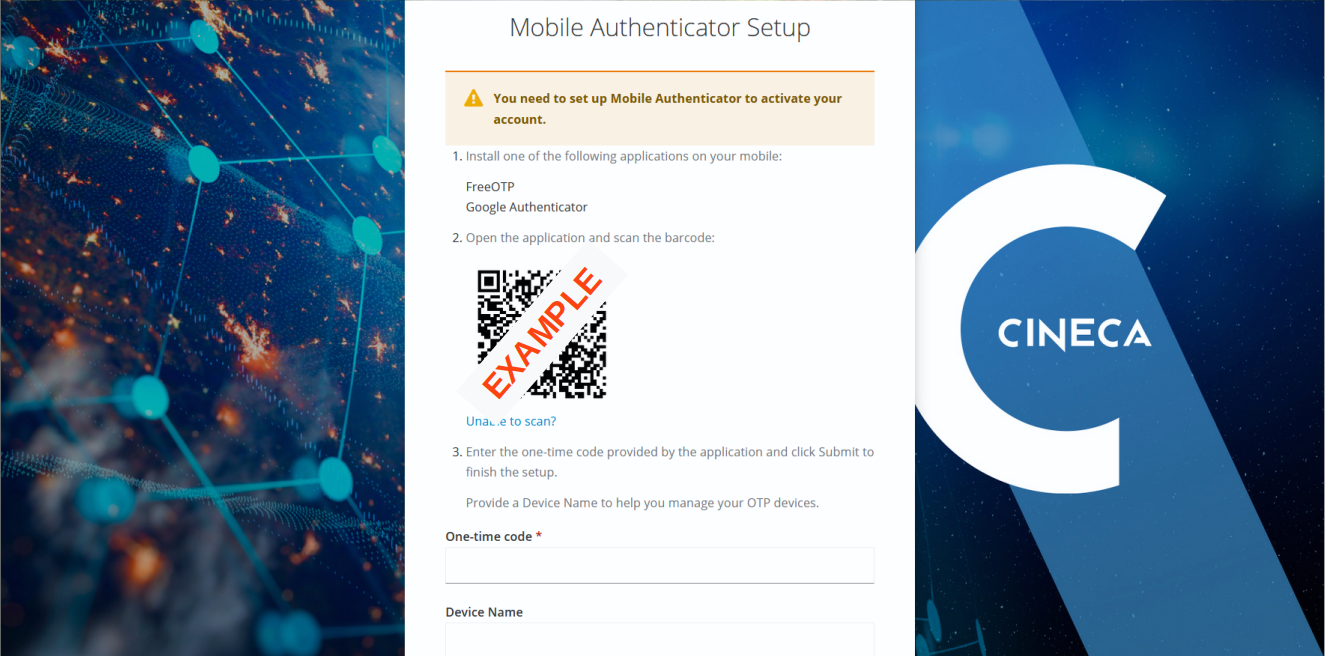
Step 4 - OTP Applications
Authentication codes can be generated using either FreeOTP or Google Authenticator, or other compatible apps. If you don’t already have one of these apps, download it onto your smartphone.
Once the app is installed, use it to scan the QR code displayed on the setup page. The OTP will be automatically configured on your authenticator.
As a final step, enter the 6-digit code that appears in the app to verify the correct configuration. If you have multiple OTPs in the app, the correct one will be labeled “CINECA HPC: <your username>”.
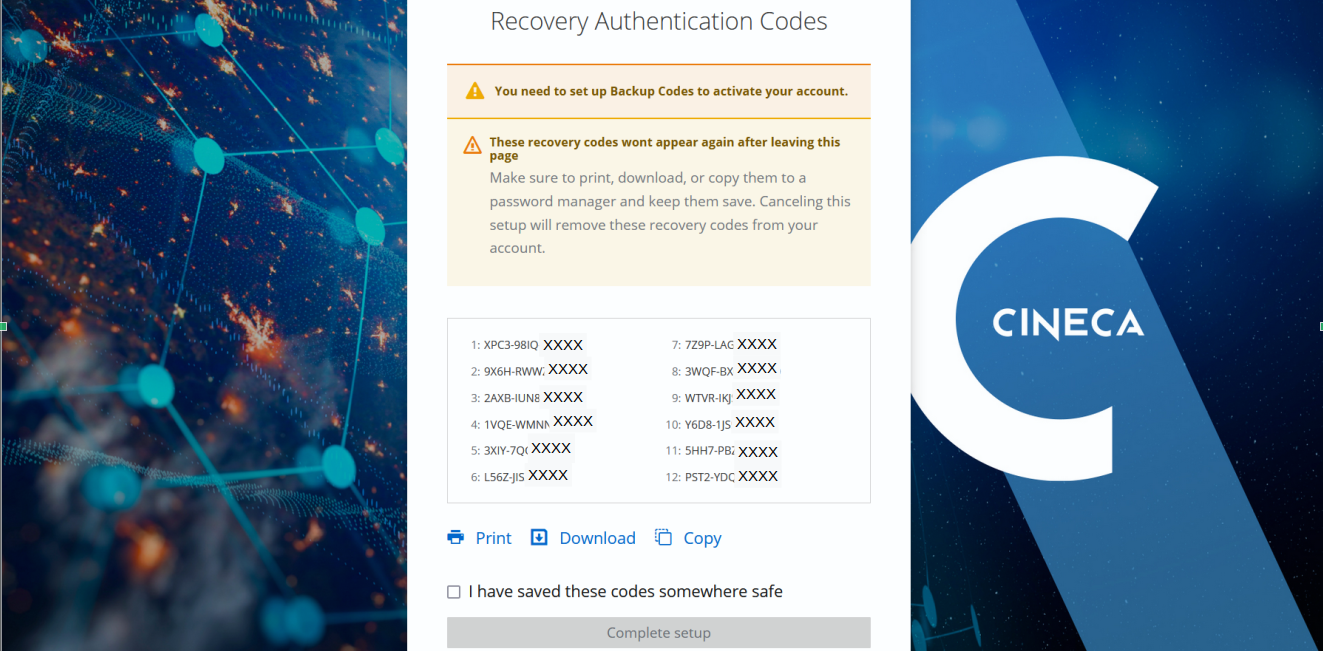
After verifying the correct configuration, the following page will display your Recovery codes. Save these codes by downloading, printing, or copying them into a text file.
Warning
Recovery codes are requested to the user in case of problems with your management of the OTP codes (for example, issues with the app or smartphone lost), so saving them somewhere is very important.
Step 5
At this point, your 2FA is active and your OTP configuration is done. In case you are a user of HPC resources (not Cloud), you can follow the guide below to setup the smallstep client for the authentication certificate and to connect to the HPC clusters via ssh protocol.
Important
If you need to regenerate the OTP, please refer to the procedure outlined in the Manage your HPC credentials.
Users that want to get access only to Cloud resources can skip the next steps.
Once 2FA is enabled as authentication method for CINECA clusters,
you will need to install and configure a 2FA-compatible program on your PC, to download the temporary certificate
locally. At CINECA, we recommend using the Smallstep client.
Note
smallstep client is not required to access to cloud resources.
To obtain and install the Smallstep executable, visit the Smallstep website and follow the installation instructions for your operating system.
Alternatively, you can download the executable directly from the GitHub repository.
After installation, you must configure Smallstep according to your operating system’s requirements.
If you encounter any issues or need further assistance, please contact superc@cineca.it.
Linux/MacOS Systems
Warning
Users with Ubuntu Linux operating systems (also for other Linux distributions) should not run the command sudo apt install step because this will install a different software that will give errors when following the rest of the instructions.
Step 1
Configure smallstep on your system by running the following command line instructions in your shell:
If you have a previous version of smallstep installed and configured on your system, the client will ask if you want to overwrite the existing configuration.
To save a copy of a previous version of smallstep installed and configured on your system, make a copy of the directory .step.
Step 2
To use the certificate created in Step 1, the user should activate the ssh-agent running with the following command:
eval$(ssh-agent)
Note
If the agent is already active, this step is not required.
Step 3
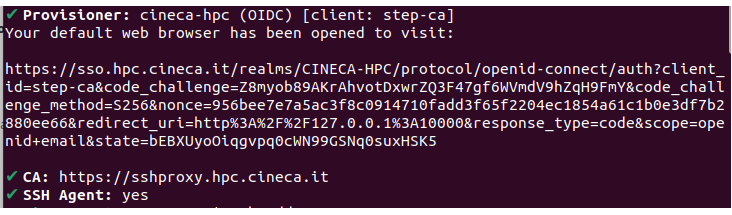
To use the certificate for the authentication, use the command:
stepsshlogin'<user-email>'--provisionercineca-hpc
The command will prompt an output as in this figure:
Step 4
Once the certificate is created, a webpage will automatically open in your default browser.
You will need to sign in using your cluster credentials (username and password). Afterwards, you will be prompted to enter a temporary code generated by your OTP application to complete the process.
Once authenticated, you will see a Success message on your browser, meaning that the certificate has been generated and it is available on your PC.
Note
the certificate is valid for 12 hours !!! If you reboot your PC, the certificate is lost and you need to download a new one (repeating step 3 step ssh login … ) !
Windows users have multiple options:
Windows Powershell
Step 1
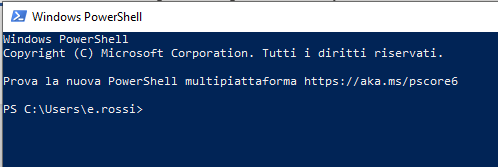
Open the Powershell. Windows O.S will show the standard prompt
Step 2 - Download and install step
From the Powershell prompt type the command:
wingetinstallSmallstep.step
and type “Yes” or “Y” if prompted. After the installation, close and reopen Powershell so that the alias for step will become available.
If the service is not in runningstatus, it can be activated with:
Start-Service-Namessh-agent
Note
If the service will not start after the comamnd Start-Service-Namessh-agent, the user can force the activation by opening
a Powershell with administration privileges (from the control panel of Windows) and use the following commands:
To proceed, open a shell and install Step by carefully following the installation instructions for the Linux environment.
WSL does not support separate tabs, and any new window will not recognize a previously issued Step certificate by default.
To avoid generating a new timed certificate for each session, we recommend adding an automatic certificate verification process in your WSL .bashrc file.
This process can utilize variables initialized by the eval$(ssh-agent) command and redirect them to an appropriate text file.
For example:
if[-f~/.bash_agent];then
.~/.bash_agent
fisteptest=$(stepsshlist--raw'<user-email>'|stepsshinspect|grep"Valid")if[-z"$steptest"]theneval$(ssh-agent)echo"export SSH_AUTH_SOCK=$SSH_AUTH_SOCK">~/.bash_agent
echo"export SSH_AGENT_PID=$SSH_AGENT_PID">>~/.bash_agent
stepsshlogin'<user-email>'--provisionercineca-hpc
fi
Clients SSH/SFTP under Windows
There are many SSH or SFTP Clients available for Windows, that are of common usage but are not automatically configured for working with the new 2FA system.
It is possible to login with them by exploiting the OpenSSH agent forwarding that can be set by taking advantage of another tool installable on Powershell,
that is WinSSH-Pageant.
Step 1 - as a prerequisite, complete the configuration for Powershell as explained in the dedicated paragraph above.
Step 2 Download WinSSH-Pageant
wingetinstallwinssh-pageant
after downloading, you should find a new executable in the following path:
Keep in mind though that Powershell keeps an alias alive only until the shell is closed.
An easy permanent solution would be to copy the program winssh-pageant.exe to another folder,
for example one that is been already included permanently in the PATH variable by the
previous installation of step and is therefore recognized by Powershell without the need of expliciting the full path.
Step 3
Launch the WinSSH-pageant with the command: winssh-pageant--sshpipe
Check if winssh-pageant is active and works properly
Get-Process|Select-Stringpageant
You should expect an output like:
System.Diagnostic.Process(winssh-pageant)
Step 4 - Create a new certificate
stepsshlogin<your-email>--provisionercineca-hpc
At this point you can connect via SSH/SFTP client by using your preferred client. In the following, we report the proper settings for the most popular clients (Putty, WinSCP, Filezilla, MobaXterm).
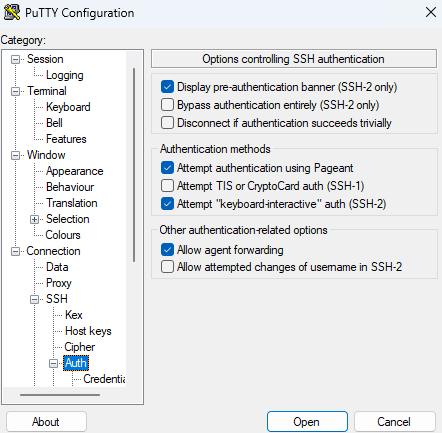
Putty:
In the login window, check the category “Connection –> SSH –> Auth” and be sure that the boxes “Attempt authentication using Pageant” and “Allow agent forwarding” are ticked.
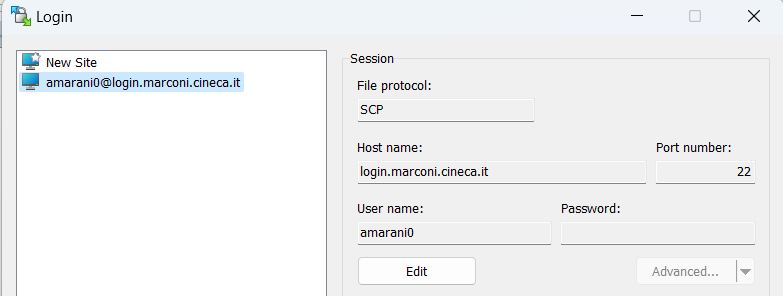
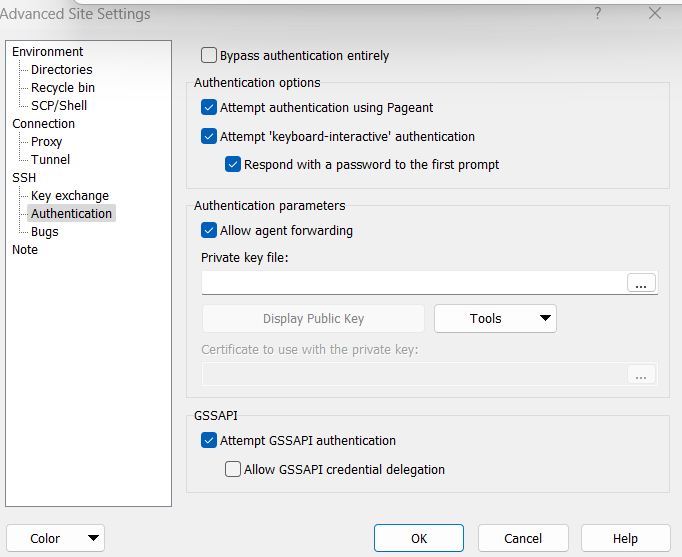
WinSCP:
In the login window, from the Advanced settings go to “SSH–> Authentication” and tick the boxes “Attempt authentication using Pageant” and “Allow agent forwarding”. Be sure that the file protocol is set to “SCP”.
Note: It is possible that if you try to edit an already saved site, the ssh-agent won’t be recognized. If this is the case, we recommend to create a new site from scratch and configure it accordingly. The new site can then be saved and will keep working.
Note: In certain cases, we noted that the procedure may not work at first try, and you will get an error at login even if everything is in order. In most cases, a simple reboot of your workstation solves the problem and the issue will not occur again.
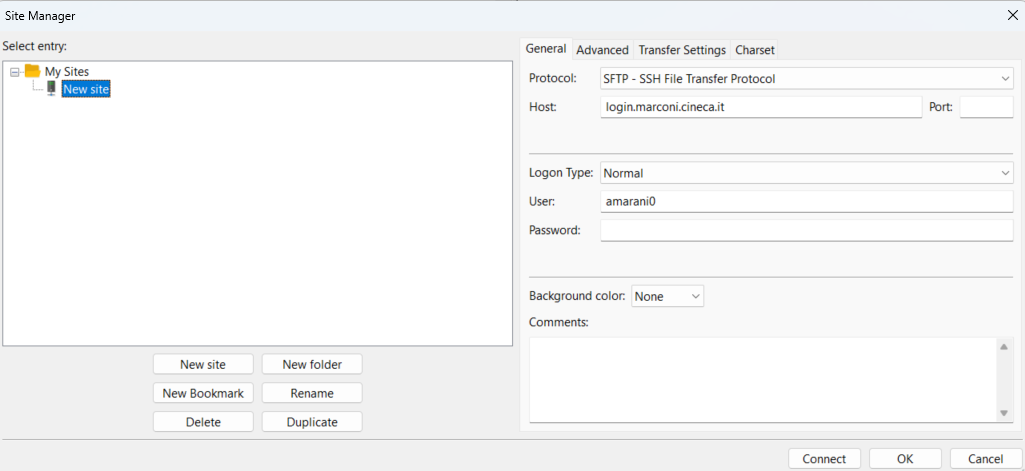
FileZilla:
In your site configuration, be sure that the Protocol is set to “SFTP - SSH File Transfer Protocol” and the Logon type is set to “Normal”.
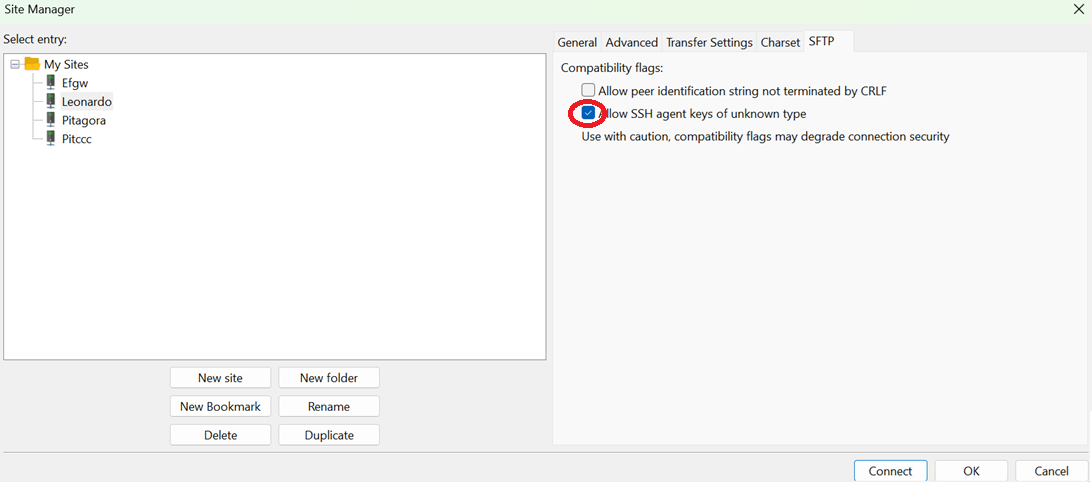
Note: With recent versions of the software, the above configuration may not be enough to guarantee the connection. It is necessary to tick the box “Allow SSH agent keys of unknown type” in the “SFTP” tab of the configuration window.
This solution was first tested with version 3.7.05 and should work from there onwards, but it may also be required with slightly previous versions.
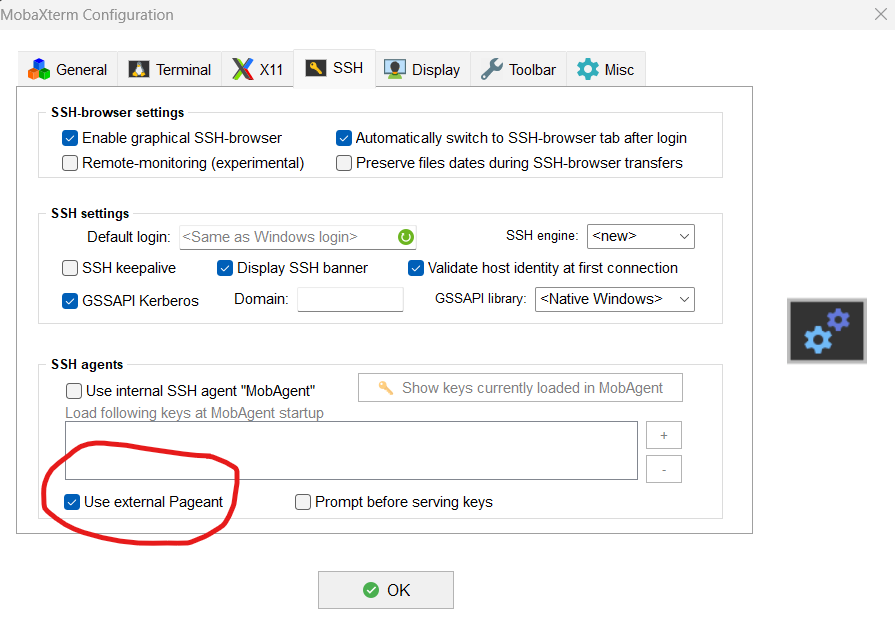
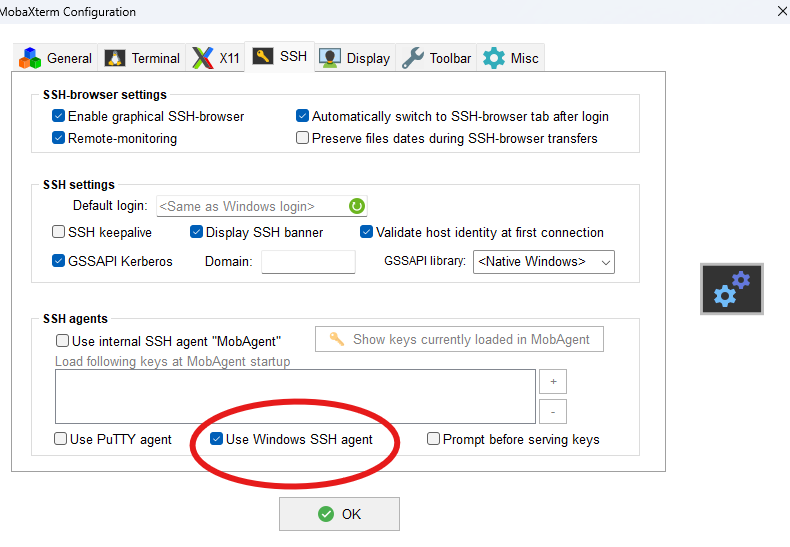
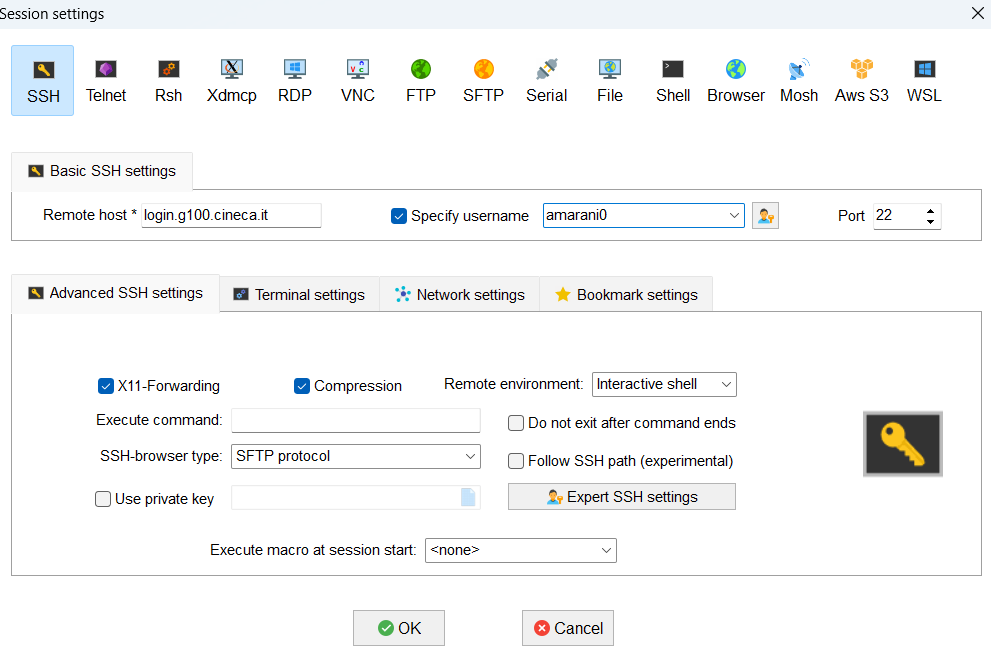
MobaXTerm:
In the upper menu bar with the general options, make sure that in “Settings” → “Configuration” → “SSH” the box “Use external Pageant” is ticked (it should be by default).
In most recent versions of MobaXTerm, the box has been removed. Ticking “Use Windows SSH agent” will work in this case.
After that, opening a simple ssh session should be enough.
Other SSH/SFTP clients don’t seem to be working with this method and are currently not supported by CINECA (for example BitviseSSH), or haven’t been tested yet. We will keep updating the Userguide when other clients will be proven compatible.
Managing authentication certificates in HPC environments involves ensuring secure access to resources. Users typically generate certificates via an Identity Provider or a local client, like Smallstep, for secure session authentication.
Key operations include:
Certificate generation: Performed during initial setup or when required by the system.
Re-generating certificates: Necessary if the current certificate expires or becomes invalid. Users typically log in to the portal or use a client tool to request a new certificate.
Certificate renewal: Ensures continued access without disruptions, often automated if supported by the system.
For issues or detailed procedures, users should consult the documentation or contact: superc@cineca.it.
If it is necessary to avoid using ssh-agent, you can download your certificate launching the following command in any path of your local PC (we suggest using the ~/.ssh folder):
A passphrase to encrypt the private key is request as input in the shell command line:
Pleaseenterthepassphrasetoencrypttheprivatekey:
Note
Three keys will be generated in the path where you executed the above command.
To use the keys to access the cluster you can place the three files in the ~/.sshfolder (default path),
or you can specify -i<path-to-keys> within the ssh command, and enter the passphrase you selected in the previous step:
SSH is commonly employed for remote access to a machine, allowing users to execute commands (remote console), run programs, and transfer files securely. On Linux and Mac systems, the SSH client is typically pre-installed. However, on Windows systems, users need to download and install an SSH client.
Some popular SSH clients for Windows include Powershell, openSSH, Putty or Tectia.
Connection adopting 2FA procedure does not require to provide password.
The access is done via one of the following commands:
You will login to our systems with one of the two shells: bash or tcsh. Contact the HPC support (superc@cineca.it) if you want to change your default login shell.
Login is prevented on systems in which you don’t have a budget account.
We have identified a potential issue for local PC with openssh 8.6 (check with the command ssh-V). The solution can be found here in our FAQ page.
Troubleshooting - WARNING: REMOTE HOST IDENTIFICATION HAS CHANGED!
The DNS listed above to access our clusters are aliases pointing at different login nodes. When accessing multiple times on the same cluster, if you end-up on a different login node than the previous session you may get the following error:
“WARNING: REMOTE HOST IDENTIFICATION HAS CHANGED!”
the reason is a possible mismatch between the DNS and the node’s fingerprint saved in your known_hosts file.
To solve this issue, we sugget the following steps.
where <cluster_dns> is the domain name system of the cluster, <cluster_explicit_dns> is the list of the explicit DNS of the login nodes, and <cluster_generic_dns> is a wildcard pattern derived from the cluster DNS used to generalize host entries in the known_hosts file.
You can find the previously configured one-line command for each cluster in our FAQ.
To generalize you can use the following:
# Define the main cluster DNS namecluster_dns=login.leonardo.cineca.it
# Define an array of explicit DNS names for each login nodeclustes_explicit_dns=(login01-ext.leonardo.cineca.it
login02-ext.leonardo.cineca.it
login05-ext.leonardo.cineca.it
login07-ext.leonardo.cineca.it
)# Generate a generic DNS pattern by replacing the first '.' with '*.'# (e.g., "login.leonardo.cineca.it" → "login*.leonardo.cineca.it")cluster_generic_dns="${cluster_dns/./*.}"# Remove any existing SSH key entries for the main cluster DNS from known_hostsif[-f~/.ssh/known_hosts]thenssh-keygen-f~/.ssh/known_hosts-R${cluster_dns}fi# Loop over the key algorithms to scan (e.g., rsa ecdsa ed25519 dsa)forkeyalinrsaecdsaed25519dsa
do# Loop over all explicit login node DNS entriesforaddressin${cluster_explicit_dns[@]}do# Retrieve the SSH public key for the node using ssh-keyscan# Replace the explicit node address with the generic pattern in the output# Append the result to the known_hosts filessh-keyscan-t${keyal}${address}|sed"s/${address}/${cluster_generic_dns}/g">>~/.ssh/known_hosts
donedone
Open your Powershell terminal and run the following command:
where <cluster_dns> is the domain name system of the cluster, <cluster_explicit_dns> is the list of the explicit DNS of the login nodes, and <cluster_generic_dns> is a wildcard pattern derived from the cluster DNS used to generalize host entries in the known_hosts file.
You can find the previously configured one-line command for each cluster in our FAQ.
To generalize you can use the following:
# Define the main cluster DNS name$cluster_dns="login.leonardo.cineca.it"# Define an array of explicit DNS names for each login node$cluster_explicit_dns=@("login01-ext.leonardo.cineca.it","login02-ext.leonardo.cineca.it","login05-ext.leonardo.cineca.it","login07-ext.leonardo.cineca.it")# Generate a generic DNS pattern by replacing the first '.' with '*.'# (e.g., "login.leonardo.cineca.it" → "login*.leonardo.cineca.it")$cluster_generic_dns=$cluster_dns-replace'\.','*.',1# Path to known_hosts$known_hosts_path="$HOME\.ssh\known_hosts"# Remove any existing SSH key entries for the main cluster DNS from known_hostsif(Test-Path$known_hosts_path){ssh-keygen-f$known_hosts_path-R$cluster_dns|Out-Null}# Loop over the key algorithms to scan$keyal_list=@("rsa","ecdsa","ed25519","dsa")foreach($keyalin$keyal_list){foreach($addressin$cluster_explicit_dns){# Retrieve the SSH public key for the node$keyscan_output=ssh-keyscan-t$keyal$address2>$null# Replace the explicit node address with the generic pattern$updated_output=$keyscan_output-replace[regex]::Escape($address),$cluster_generic_dns# Append the result to the known_hosts fileAdd-Content-Path$known_hosts_path-Value$updated_output}}
Remote visualization has become popular as an HPC service since it allows to:
visualize the data produced on HPC infrastructure (scientific visualization)
analize and inspect data directy on the HPC infrastructure.
debug and optmization of codes via GUI tools directly on the HPC infrastructure.
All the aforementioned use cases can take advantage of use applications on the server side. The requirements to access to this service are the same for the access to HPC infrastructure.
The remote visualization service at Cineca is provided through the Remote Connection Manager (RCM) application. Using this tool you can graphically inspect your data without moving them to your local work station.
Important
It can be used by any user with valid credentials to access CINECA clusters.
Continuous Integration, continuous delivery and deployment, also known as CI/CD, is the practice of a constant monitoring of the code development through the activation of an automatic pipeline. Every time a developer applies a change to the code, the automatic pipeline validates it by building the code and running some simple tests (typically unit tests).
CINECA has activated a new service where to run your Continuous Integration (CI/CD) pipelines on CINECA clusters, based on CINECA GitLab service. On Gitlab website there is a detailed documentation about CI/CD.
This service is active on Galileo100, and is at the moment in an experimental phase.
How to use it
You can activate our CI/CD service in projects defined into our GitLab instance. If you are already a CINECA HPC user, you can access the CINECA GitLab using the same credentials. If you are interested and you are still not an HPC User you can find here the instructions on how to get access.
Once logged to CINECA GitLab, you can activate the CI/CD service by enabling shared runners that pick up and execute your CI/CD pipeline on our cluster.
They can be enabled as in the following:
From your project’s web page, select “Settings” and then on “CI/CD”, from the menu on the left;
Once in the web page, expand the section “Runners”;
Activate the switch under “Enable shared runners for this project” on the right, in the “Shared Runners” right column. The shared runners are listed in that section along with blue labels specifying the tags associated to them.
Now shared runners are available to your CI/CD pipeline.
The CI/CD pipeline has to be specified inside the .gitlab-ci.yml file through tags (see Gitlab documentation for how to create and manage pipelines).
IMPORTANT: There are two different kind of runners. You have to identify which runner you would like to run your pipeline by specifying one or more tags summarized in the table at the bottom of the page.
IMPORTANT: If you do not select any tag, the pipeline will never start.
We set a time limit for the execution of each single job of a given pipeline that cannot last for more than 10 minutes.
Runners description
All shared runners are based on docker images, so in your CI/CD pipeline you can optionally choose in which container image your pipeline job will run.
You will find 4 distinct shared runners, consisting of:
2 CPU-only runners, with access to up to 24 CPUs each. Jobs are executed in concurrent execution. (specific tags: x86_64, cpu, docker)
2 CPU+GPU runners, limited to run 1 CI job each at the time. Each runner has access to a dedicated GPU. No concurrent execution is allowed on these runners. (specific tags: x86_64, docker, nvidia-sm70, nvidia-volta, nvidia-cuda)
All shared runners run on a dedicated node of Galileo100 with Intel x86_64 architectures (2 x CPU Intel CascadeLake 8260 processors with 24 cores each, 2.4 GHz, 384GB RAM).
GPU runners make use of Nvidia V100 GPUs.
Summary
Below we summarize the runners and the tags needed to select the correct one.
An X.509 certificate is issued by a trusted Certificate Authority (CA), which verifies the user’s identity and ensures the certificate is both valid and associated with a real individual.
It is used as an authentication mechanism, serving as an alternative to traditional username/password credentials, and helps avoid the need to replicate user accounts across systems.
When connecting to a service, the user’s certificate is mapped to a local account, under which all commands and operations are executed.
Important
Access to CINECA clusters no longer requires or supports X.509 certificates for authentication.
However, X.509 certificates may still be necessary for accessing certain external services or resources, such as data repositories, collaboration platforms, or grid computing infrastructures.
The following describes the procedure for obtaining an X.509 certificate and generating a proxy certificate for temporary use.
How to get your X.509 certificate
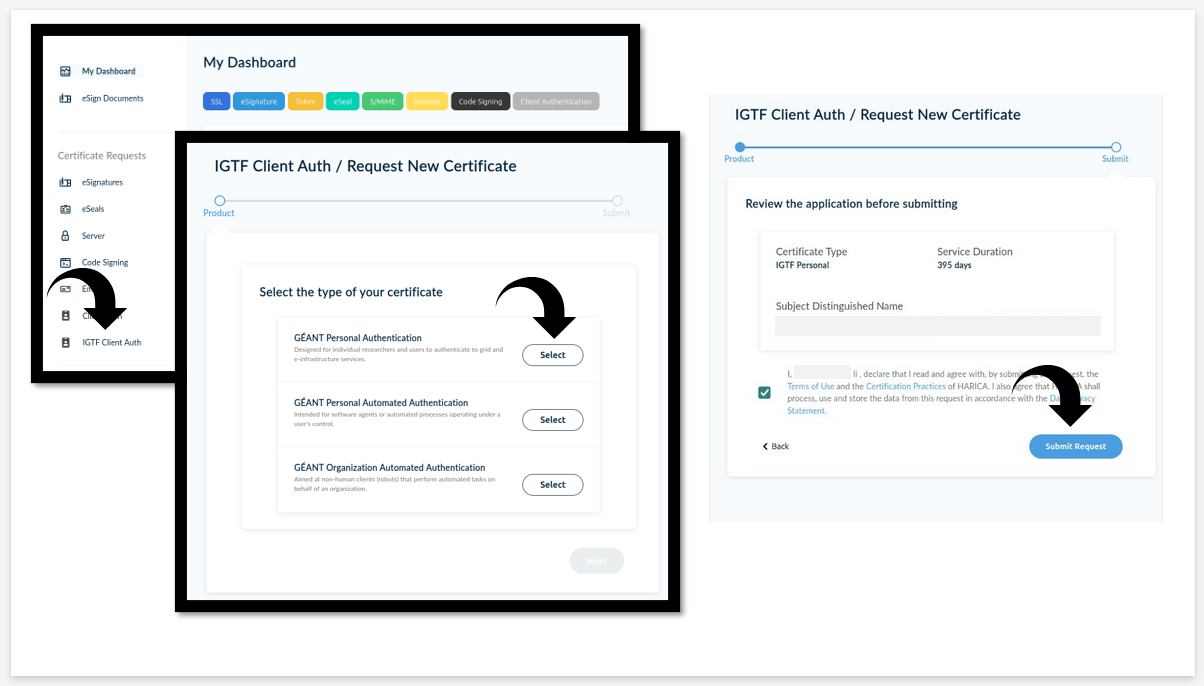
Users in need of an X.509 certificate can visit the HARICA website. Academic users can select Academic Login and authenticate using their institutional credentials.
In the dashboard’s left-hand menu, click on IGTF Certificate, then select GÉANT Personal Authentication.
Review and accept the terms and conditions, then click Submit Request.
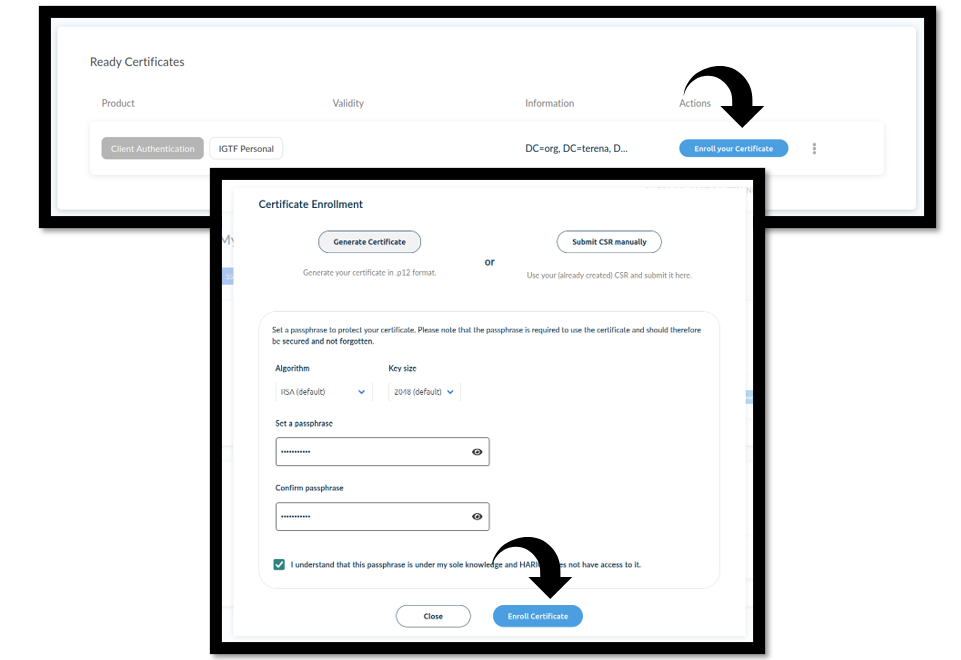
Under Ready Certificates, click Enroll your Certificate. Choose your preferred algorithm (RSA or ECDF), then click Enroll Certificate again. After enrollment, click Download.
A .p12 file (containing your personal certificate and private key) will be downloaded.
How to Use Your X.509 Certificate (Browser and Command Line)
Once you have downloaded your .p12 certificate file, you can either:
Import it into your browser for web-based authentication.
Convert it into PEM format (cert.pem and key.pem) to use it with command-line tools such as grid-proxy-init, voms-proxy-init, or globus-url-copy.
Using the .p12 Certificate in Your Browser
Firefox:
Go to Settings → Privacy & Security → Certificates → View Certificates.
Open the Your Certificates tab.
Click Import, then select your .p12 file.
Enter the password used to protect the certificate.
Your certificate is now ready for web authentication.
Chrome / Edge / Safari:
These browsers use the system certificate store.
On Linux (GNOME): Use the Passwords and Keys application (Seahorse) → Import your .p12 file.
On macOS: Double-click the .p12 file to open Keychain Access → import it into the login or system keychain.
On Windows: Double-click the .p12 file → follow the Certificate Import Wizard, choose “Current User”, and confirm the installation.
Converting .p12 to cert.pem and key.pem for Command-Line Use
To use your certificate with command-line tools, you’ll need to copy the cert.p12 file in your $HOME, create the directory $HOME/.globus and finally extract the certificate and private key from the .p12 file using OpenSSL: