File Systems and Data Management
All HPC systems share the same logical disk structure and file system definition. In Cineca, all the filesystems are based on Lustre. The available storage areas can have multiple definitions/purposes:
temporary: data are accessible for a defined time window, after that data will be canceled.
permanent: data are accessible for additional six months after the end of the project.
Storage areas can be also:
user specific: each user has exclusive data area.
shared: area accessible by all collaborators belonging the same project.
open: area accessible by all users of an HPC system.
Note
The available data areas are defined, on all HPC systems, through predefined environment variables. You can access on these areas simply using the name reported in the following table.
Users hare strongly encouraged to use predefined environment variables instead of the full path (e.g: in scripts and codes data).
Name |
Area Attributes |
Quota |
Backup |
Note |
|---|---|---|---|---|
$HOME |
permanent, user specific |
50 GB |
daily |
|
$WORK |
permanent, shared |
1 TB |
no |
Large data to be shared with project’s collaborators. |
$FAST |
permanent, shared |
1 TB |
no |
Only on Leonardo. Faster I/O compared with outer areas. |
$SCRATCH |
temporary, user specific |
-/20 TB |
no |
files older than 40 days are deleted |
$TMPDIR |
temporary, user specific |
(-) |
no |
directory removed at job completion |
$PUBLIC |
permanent, open, user specific |
50 GB |
no |
Only on Leonardo. |
$DRES |
permanent, shared |
defined by project |
no |
Warning
The backup service on the $HOME areas may be temporarily not active on some HPC clusters. Please check the Documentation session dedicated to each cluster.
Warning
Ethical use of the $SCRATCH Area. Users are encouraged to respect the intended use of the various areas. Users are reminded that the $SCRATCH area is not subject to restrictions (quota) to facilitate the production of data, even large amounts. However, the $SCRATCH area should not be used as a temporary storage area. Users are warned against using “touch” commands or similar methods to extend the retention of files beyond the 40-day limit. The use of such “improper” procedures will be monitored, and users will be subject to various degrees of restrictions up to a ban!
Areas Details
$HOME: permanent, user specific
$HOME is a local area where you are placed after the login procedure.
It is where system, and user applications store their dot-files and dot-directories (.nwchemrc, .ssh, …)
and where users keep initialization files specific for the systems (.cshrc, .profile, …).
There is a $HOME area for each username on the machine. This area is conceived to store programs and small personal data.
It has a quota of 50 GB. Files are never deleted from this area. Moreover, they are guaranteed by daily backups:
if you delete or accidentally overwrite a file, you can ask our Help Desk to restore it. A maximum of 3 versions of each file is stored as a backup.
The last version of the deleted file is kept for two months, then definitely removed from the backup archive. File retention is related to the life of the username; data are preserved until the username remains active.
$WORK: permanent,shared
$WORK is a scratch area for collaborative work within a given project. File retention is related to the life of the project. Files in $WORK will be conserved up to 6 months after the project end, and then they will be cancelled. Please note that there is no back-up in this area.
This area is conceived for hosting large working data files since it is characterized by the high bandwidth of a parallel file system. It behaves very well when I/O is performed accessing large blocks of data, while it is not well suited for frequent and small I/O operations. This is the main area for maintaining scratch files resulting from batch processing.
There is one $WORK area for each active project on the machine.
The default quota is 1 TB per project, but extensions can be considered by the Help Desk if motivated. The owner of the main directory is the PI (Principal Investigator) of the project.
All collaborators are allowed to read/write in there. Collaborators are advised to create a personal directory in $WORK for storing their personal files.
By default, the personal directory will be protected (only the owner can read/write), but protection can be easily modified, for example by allowing write permission to project collaborators through chmod command.
This second approach does not affect global files security. The chprj change project command makes it easier to manage the different $WORK areas for different projects.
Summary
created when a project is opened.
each project has its own area.
all collaborators can write in the area.
each user has as many $WORK areas as active projects.
by default files are private.
users can change file permission to make them visible, readable and writable to project’s collaborators.
$FAST: permanent, shared (Leonardo only)
$FAST is a scratch area for collaborative work within a given project. File retention is related to the life of the project. Files in $FAST will be conserved up to 6 months after the project end, and then they will be cancelled. Please note that there is no back-up in this area.
This area is conceived for hosting working data files whenever the I/O operations constitute the bottleneck for your applications. It behaves well both when I/O is performed accessing large blocks of data, and for frequent and small I/O operations. Due to the limited size of the area, the main space for maintaining the data resulting from batch processing is the corresponding $WORK area.
There is one $FAST area for each active project on the machine. The fixed quota is 1 TB per project, and due to the total dimension of the storage, extensions cannot be considered. The owner of the main directory is the PI (Principal Investigator) of the project. All collaborators are allowed to read/write in there. Collaborators are advised to create a personal directory in $FAST for storing their personal files. By default, the personal directory will be protected (only the owner can read/write), but protection can be easily modified, for example by allowing write permission to project collaborators through chmod command. This second approach does not affect global files security.
$SCRATCH: temporary, user specific
This is a local temporary storage conceived for temporary files from batch applications. There are important differences with respect to $WORK area. It is user specific (not project specific). By default, file access is closed to everyone, in case you need less restrictive protections, you can set them with chmod command.
On this area, a periodic cleaning procedure could be applied, with a normal retention time of 40 days: files are daily cancelled by an automatic procedure if not accessed for more than 40 days. In each user’s home directory ($HOME) a file lists all deleted files for a given day.
CLEAN_<yyyymmdd>.log

<yyyymmdd> = date when files were cancelled
Summary
created when a user has granted access.
each user has it own area (exclusively).
files older than 40-days are cancelled.
no quota
by default files are public (read only).
user can change file permission to make files private.
Warning
Users are encouraged to respect the intended use of the various areas. Users are reminded that the SCRATCH area is not subject to restrictions (quota) to facilitate the production of data, even large amounts. However, the SCRATCH area should not be used as a temporary storage area. Users are warned against using “touch” commands or similar methods to extend the retention of files beyond the 40-day limit. The use of such “improper” procedures will be monitored, and users will be subject to various degrees of restrictions up to a ban.
$TMPDIR: temporary, user specific
Each compute node is equipped with a local area whose dimension differs depending on the cluster. When a job starts, a temporary area is defined on the storage local to each compute node.
On login nodes:
TMPDIR=/scratch_localOn Galileo100:
TMPDIR=/scratch_local/slurm_job.$SLURM_JOB_IDOn Leonardo:
TMPDIR=/tmp(visible with the commanddf -h /tmp). Special behavior can be found in the specific section Leonardo.
If more jobs share one node, each one will have a private/tmp in the job’s user space.
The TMPFS are removed at the end of each job (data will be deleted). Whatever the mechanism, the TMPDIR can be used exclusively by the job’s owner. During a job, user can get access to the area with local variable $TMPDIR.
In a sbatch script, for example, user can move the input data of simulations to the $TMPDIR before the beginning of job run and also write on $TMPDIR job output. This would further improve the I/O speed of a code.
Please note that the area is located on local disks, so it can be accessed only by the processes running on the specific node. For multinode jobs, if you need all the processes to access some data, please use the shared filesystems $HOME, $WORK and $SCRATCH.
$PUBLIC: permanent, open, user specific (LEONARDO ONLY)
$PUBLIC is a shared area. Each username on the machine owns a $PUBLIC area with a quota of 50 GB. This area is accessible by every other user of the cluster. File retention is related to the life of the username; data are preserved until the username remains active. Please note that there is no back-up in this area.
$DRES: permanent, shared (among platforms and projects)
This is a repository area for collaborative work among different projects and across platforms. You need to explicitly ask for this kind of resource: it does not come as part of a project contact the user support.
- File retention is related to the life of DRES itself. Files in DRES will be conserved up to 6 months after DRES completion, then they will be cancelled. Several types of DRES are available, at present:
FS: normal filesystem access oh high throughput disks, shared among all systems (mounted only on login nodes).
ARCH: magnetic tape archiving with a disk-like interface via LTSFS.
REPO: smart repository on iRODS.
Summary
created on request.
non linked to a specific project.
all collaborators can write in.
compute nodes cannot access to data in $DRES.
by default files are public (read only).
Quota based on needs.
No backup.
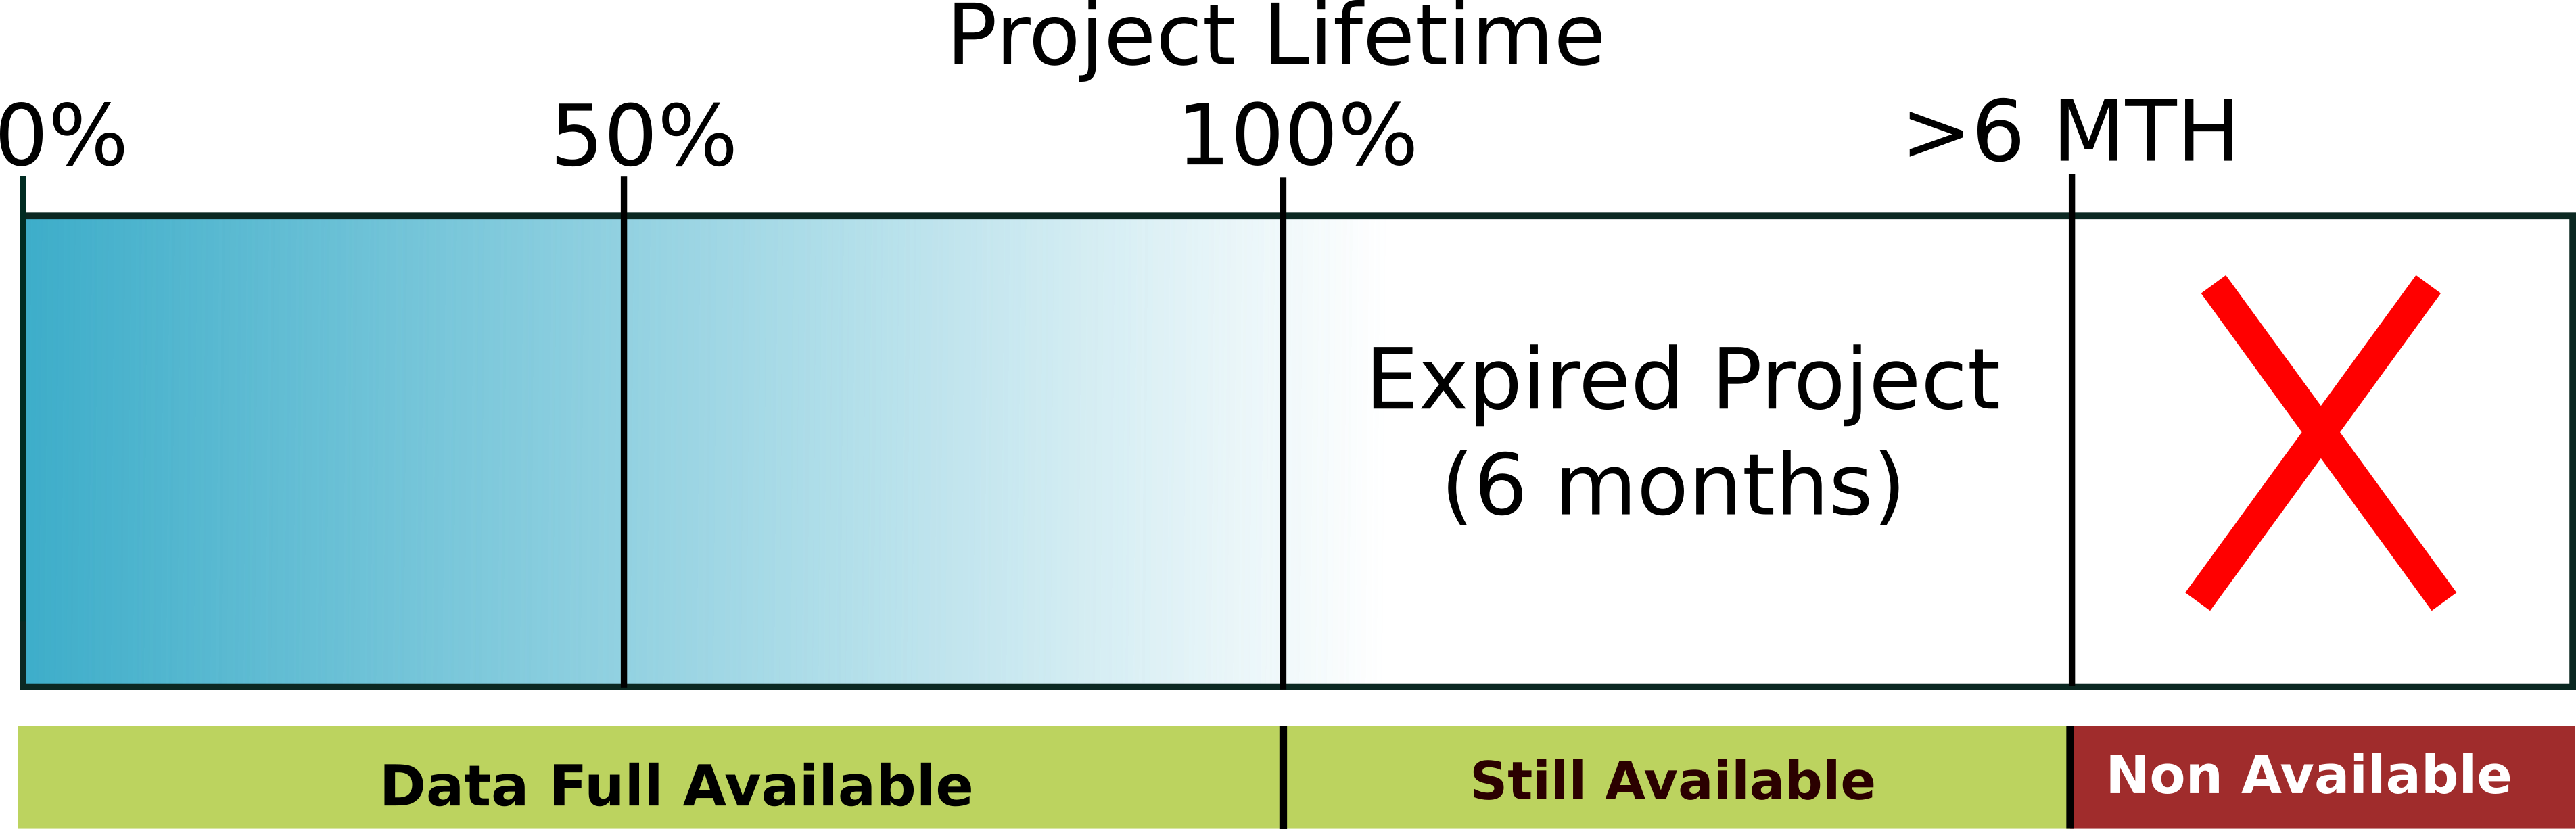
Backup Policy and Data Availability
Daily backups guarantee the $HOME filesystem. In particular, the daily backup procedure preserves a maximum of three different copies of the same file. Older versions of files are kept for 1 month. The last version of deleted files is kept for 2 months, then definitely removed from the backup archive. Different agreements about Backup policies are possible. For more information contact the HPC support (superc@cineca.it). Data, both backed up and non-backed up, are available for the entire duration of the project. After a project expires, users will still have full access to the data for an additional six months. Beyond this six-month period, data availability is not guaranteed.
Important
Users have responsibility to backup their important data !!!
A scheme of data availability is reported in the figure below.

Lustre Best Practice
Overview
Lustre is a parallel distributed filesystem ideal in handling large files accessed by many compute nodes. However, it struggles with small files and certain access patterns common in desktop and enterprise environments. Following best practices can minimize expensive operations and improve performance.
Key Recommendations
- Minimize Metadata Operations
Avoid frequent access to file attributes (e.g., size, type, permissions) and commands like
ls -l. Use simpler alternatives (lsorlfscommands).
- Avoid Metadata-Intensive Commands
Refrain from using commands like
ls -R,find,du, anddf. Instead, use Lustre-specific tools likelfs find.
- Limit Wildcard Usage
Expanding wildcards (e.g., * or ?) is resource-intensive, especially when matching many files in a large directory. For instance, commands like
rm *.tmpcan significantly degrade performance on Lustre. Instead, precompile a list of target files (e.g.,lfs find . -name "*.tmp" > files_to_delete.txt) and process them iteratively. This method avoids the overhead of expanding wildcards directly on the filesystem. For large-scale operations, ensure scripts are designed to handle smaller batches of files to reduce the impact on metadata servers.
- Organize Files
Avoid storing large numbers of files in a single directory. This creates contention as Lustre locks the parent directory when files are accessed, leading to performance bottlenecks. Use subdirectories to distribute files. A common approach is to create directories based on the square root of the total number of files. For example, 90,000 files could be split into 300 directories with 300 files each. Logical data grouping (e.g., by date or project) can further streamline access and maintenance.
- Avoid Small Files
Accessing small files is inefficient. Where possible, combine them into larger files (e.g., using
tar) or use formats like HDF5 or NetCDF. If the total size of the small files is manageable (e.g., a few GB), copy them to a local directory (/tmp) on the compute nodes at the start of a job and clean up afterward. Alternatively, create read-only disk images (e.g., ISO) that can be mounted via loopback. Tools like Singularity can facilitate this approach for containers.
- Minimize Repeated Operations
Perform all I/O in a single session instead of frequent, small operations. For example, avoid operations such as appending small amounts of data repeatedly. Instead, open the file once, perform all operations in a single session, and close the file. For append-heavy workloads, consider buffering data in memory and writing it in larger chunks.
- Prevent File Access Contention
Avoid multiple processes accessing the same file region or appending to the same file simultaneously. Use a single “master” process for such operations. Use strategies like file replication, splitting files, or delegating access to a single master process. Ensure processes access distinct file regions whenever possible.
- File Locking and Backups
Use file locking (flock) only when necessary, as it can impact performance. Lustre generally manages non-overlapping writes and concurrent append operations effectively. Regularly back up data to a secure location, as Lustre does not provide built-in backup capabilities.
File Striping
File striping is a method employed in Lustre to enhance data access and storage performance by distributing the contents of a single file across multiple storage devices, or OSTs (Object Storage Targets). Rather than storing a file as a single block on one device, striping breaks the file into smaller pieces, (or “stripes”) with each chunk written to a different device according to a set pattern. This approach helps increase throughput, improve parallelism, and reduce bottlenecks.
The striping of a file can be defined by different parameters, the most important are:
- the Stripe Count, which indicates the number of OSTs across which a file is distributed.
A stripe count of 1 means the file is stored on a single OST, while higher values spread the file across multiple OSTs in a round-robin fashion.
- the Stripe Size, which refers to the amount of data (typically in bytes) written consecutively to a single OST before moving to the next OST.
Common defaults are around 1 MB, but it can range from 512 KB up to several GB. Choosing the right stripe size balances between overhead and parallelism.
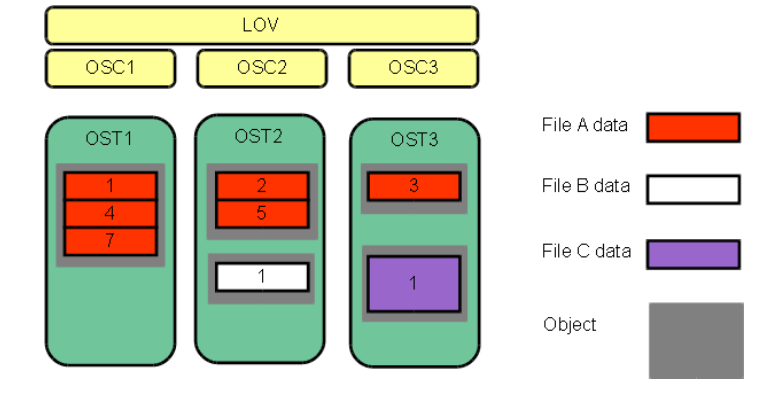
In the following scheme, different striping examples are reported: File C has a larger stripe size than File A, allowing more data per stripe. File A is striped across three OSTs (stripe count = 3), while Files B and C are stored on a single OST (stripe count = 1). No space is reserved on the OST for unwritten data.
The Parallel File Layouts (PFL) defines how this striping is applied to files (or directories). It allows to specify how files should be split across storage resources, setting the for example the stripe count and the stripe size. The layout can vary based on different factors like file size, filesystem, and hardware configuration. For example, the PFL can be configured to limit the number of stripes for small files, while setting a higher stripe count for large files.
In the following scheme, one PFL example is reported in details:
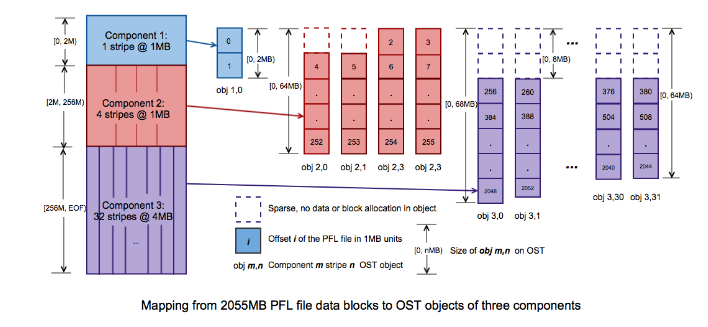
The PFL consists of three Components, (defined by range: 0-2MB, 2MB-256MB and 256MB-EOF), mapping a 2055MB file. The first two components use a 1MB stripe size, while the third uses a 4MB stripe size. The stripe count increases with each component and accordingly with the file size, (Component 1: stripe count =1, Component 2: stripe count =4 and Component 3: stripe count = 32).
The first component of our 2055MB file, contains two 1MB blocks in a single 2MB object. The second component spans 254MB across four OST objects, each holding 64MB, with a 1MB hole in the first two objects. The third component distributes 1800MB across 32 OST objects, each holding 64MB, except obj 3,0 and obj 3,1, which contain extra chunks. Additional data would only expand component 3.
Here are the default Parallel File Layouts (PFL) for all CINECA HPC systems utilizing Lustre.
Note
Since Lustre cannot know the final size of a file a priori, it starts creating it incrementally following the PFL. A file of many GB will have the first MB with striping rules similar to those of small files, then the rest like large files.
Here are the default Parallel File Layouts (PFL) for all CINECA HPC systems utilizing Lustre.
Filesystem |
PFL ranges |
PFL Parameters |
|---|---|---|
$HOME |
File size = 64 kB - 10 GB File size = 10 GB - EOF |
Stripe count = 1, Stripe size = 1 MB Stripe count = 4, Stripe size = 1 MB |
$WORK |
File size = 64 kB - 10 GB File size = 10 GB - 100 GB File size = 100 GB - EOF |
Stripe count = 1, Stripe size = 1 MB Stripe count = 2, Stripe size = 1 MB Stripe count = 4, Stripe size = 1 MB |
$FAST |
File size = 64 kB - 10 GB File size = 10 GB - 100 GB File size = 100 GB - EOF |
Stripe count = 1, Stripe size = 1 MB Stripe count = 2, Stripe size = 1 MB Stripe count = 4, Stripe size = 1 MB |
$SCRATCH |
File size = 64 kB - 10 GB File size = 10 GB - 100 GB File size = 100 GB - EOF |
Stripe count = 1, Stripe size = 1 MB Stripe count = 2, Stripe size = 1 MB Stripe count = 4, Stripe size = 1 MB |
$PUBLIC |
File size = 64 kB - 10 GB File size = 10 GB - EOF |
Stripe count = 1, Stripe size = 1 MB Stripe count = 4, Stripe size = 1 MB |
Filesystem |
PFL ranges |
PFL Parameters |
|---|---|---|
$HOME |
File size = 64 kB - EOF |
Stripe count = 1, Stripe size = 1 MB |
$WORK |
File size = 64 kB - 1 GB File size = 1 GB - 4 GB File size = 4 GB - EOF |
Stripe count = 1, Stripe size = 1 MB Stripe count = 4, Stripe size = 1 MB Stripe count = -1, Stripe size = 1 MB |
$SCRATCH |
File size = 64 kB - 1 GB File size = 1 GB - 4 GB File size = 4 GB - EOF |
Stripe count = 1, Stripe size = 1 MB Stripe count = 4, Stripe size = 1 MB Stripe count = -1, Stripe size = 1 MB |
Filesystem |
PFL ranges |
PFL Parameters |
|---|---|---|
$HOME |
File size = 64 kB - 10 GB File size = 10 GB - EOF |
Stripe count = 1, Stripe size = 1 MB Stripe count = 4, Stripe size = 1 MB |
$WORK |
File size = 64 kB - 10 GB File size = 10 GB - 100 GB File size = 100 GB - EOF |
Stripe count = 1, Stripe size = 1 MB Stripe count = 4, Stripe size = 1 MB Stripe count = -1, Stripe size = 1 MB |
$SCRATCH |
File size = 64 kB - 10 GB File size = 10 GB - 100 GB File size = 100 GB - EOF |
Stripe count = 1, Stripe size = 1 MB Stripe count = 4, Stripe size = 1 MB Stripe count = -1, Stripe size = 1 MB |
$PUBLIC |
File size = 64 kB - 10 GB File size = 10 GB - EOF |
Stripe count = 1, Stripe size = 1 MB Stripe count = 4, Stripe size = 1 MB |
Stripe count = -1 means that Lustre shall use every OST available for striping the file, rather than a fixed number of OSTs.
lfs setstripe command
lfs setstripe command is intended to create new files or directories with a specific PFL configuration.
lfs setstripe [--size|-s stripe_size] [--stripe-count|-c stripe_count] [--component-end|-E <comp_end>] filename|dirname
The most useful flags are:
-E <size>: This flag sets the extent of file sizes that the following striping options should apply to. For example, -E 1G applies to files that are 1GB or smaller, -E 100G applies to files between 1GB and 100GB, and so on.-c <count>: Set the stripe count, which specifies how many Object Storage Targets (OSTs) the file will be striped across. For example, -c 1 means the file will be stored on 1 OST, -c 2 means the file will be stored on 2 OSTs, and so on.-S <size>: Set the stripe size, which specifies how large each stripe will be. For example, -S 1M means each stripe will be 1MB.Examples
Create a file with striping on a single OST: This will ensure that myfile is stored entirely on a single OST, which is useful for small files.
lfs setstripe -c 1 myfileCreate a file with striping on 2 OSTs: This distributes the data of bigfile across two OSTs. It’s suitable for medium-sized files (between 10GB and 100GB).
lfs setstripe -c 2 bigfileCreate a directory with default striping: This sets the default striping for all files in /mydir to 2 OSTs. New files created in this directory will inherit this configuration.
lfs setstripe -c 2 /mydirSet both the stripe count and stripe size: This command not only sets the number of OSTs (4) but also configures the stripe size to 4MB, which is great for optimizing performance on large files. A good stripe size for sequential I/O using high-speed networks is between 1 MB and 4 MB.
lfs setstripe -c 4 -S 4M hugefileView the current striping configuration of a file: To check the current striping configuration of a file, use:
lfs getstripe largefile.txt
Data Occupancy Monitoring Tools
The occupancy status of all areas accessible to a user, along with the storage quota limits, can be monitored using a simple command available on all HPC cluster. There are two commands named cindata , cinQuota. For both commands the flag -h can be used to show the help. Both tools are available in the module cintools, which is automatically loaded in your environment.
In the following, an example of cindata and cinQuota outputs is shown.
$ cindata

USER           AREADESCR                        AREAID                  FRESH    USED      QTA    USED%    aUSED    aQTA    aUSED%

myuser00  /gpfs/work/<AccountName>       galileo_work-Acc-name          9hou     114G      --      --%      14T      30T    48.8%

myuser00  /gpfs/scratch/                 galileo_scr                    9hou     149G      --      --%     341T     420T    81.2%

myuser00  /galileo/home                  galileo_hpc-home               9hou     5.7G      50G     11.4%    16T       --      --%

myuser00  /gss/gss_work/DRES_myAcc       work_OFFLINE-DRES_myAcc-FS     9hou     2.9G      --      --%      11T      15T    73.3%

myuser00  /gss/gss_work/DRES_myAcc       work_ONLINE-DRES_myAcc-FS      9hou     1.2T      --      --%     2.8T       4T    70.0%
Interpreting the storage status can be complex. Here’s a breakdown:
OFFLINE area: this represents
DRESdata that has been stored on tape after three months of storage.ONLINE area: this represents
DRESdata that is still in the filesystem orARCHarea.
The total storage quota assigned to your DRES is indicated by the aQTA parameter in the OFFLINE line.
When the DRES is empty, the ONLINE value will be the same as OFFLINE. As files begin to be moved to tape, the ONLINE value will decrease, while the aUSED parameter in OFFLINE will increase accordingly. This indicates that you have less space available for storing new data since some of the used space has been moved to tape.
Similarly, deleting offline data will decrease the aUSED parameter in OFFLINE and increase the aQTA parameter in ONLINE by the same amount.
Remember this formula:
The additional tool for monitoring the disk occupancy is named cinQuota . A typical output of the command will contain the following information:
$ cinQuota

-----------------------------------------------------------------------------------------------------------------------------------

 Filesystem                                  used          quota         grace         files

------------------------------------------------------------------------------------------------------------------------------------

 /g100/home/userexternal/myuser00                   22.66G            50G         -            194295

 /g100_scratch/userexternal/myuser00            1.955T             0k         -             41139

 /g100_work/<AccountName>                         366.3G             1T         -            548665

-----------------------------------------------------------------------------------------------------------------------------------
Manage File Permissions
As explained above, $WORK and $DRES are environmental variables automatically set in the user environment.
$WORK variable points to a directory (fileset) specific for one of the user projects:
/gpfs/work/<account_name>.$DRES variable points to space where all of the dres are defined:
/gss/gss_work/.
in order to use a specific DRES type, the path is
$DRES/<dres_name>.
The owner of the root directory is the “Principal Investigator” (PI) of the project or the “owner” of the DRES, the group corresponds to the name of the project or the name of the DRES. Default permissions are:
own: rwx

group: rwx

other: -
in this way, all project’s collaborators sharing the same project group can read/write into the project/dres fileset, whereas others users can not.
Users are advise to create a personal subdirectory under $WORK and $DRES. By default, files into the subdirectory are private, but the owner can easily share the files with other collaborators by opening the subdirectory:
chmod 777 mydir

chmod 755 mydir
since the $WORK/$DRES fileset is closed to non-collaborators, the data sharing is active only among project’s collaborators.
Pointing $WORK to a different project: the chprj command
The user can modify the project pointed to by the variable $WORK using the change project command.
To list all your accounts (both active or completed) and the default project:
chprj -l
To set $WORK to point to a different <user_account> project:
chprj -d <account_no>
More details are in the help page of the command:
chprj -h
chprj --help
Data Transfer
Users can use login nodes to transfer small files, but we strongly suggest to use the dedicated services: CINECA provides a data transfer service based on two main tools: data movers and GridFTP.
Data movers are dedicated, containerized nodes without interactive access, supporting only a limited set of commands (scp, rsync, sftp, wget, curl, rclone, aws s3 and s3). User authentication is done via SSH certificates with 2-Factor Authentication or host-based authentication from within CINECA clusters.
GridFTP is also available on these nodes but can only be used through the globus-url-copy client, which must be run from the user’s local machine.
Further details on how to use these tools are provided in the two tabs below.
Datamovers are dedicated nodes on each HPC cluster that are designed for transferring data FROM/TO a cluster.
Hostnames and IPs
Galileo100:
alias: data.g100.cineca.it
hostnames and IPs:
dmover1.g100.cineca.it - 130.186.16.212
dmover2.g100.cineca.it - 130.186.16.213
Leonardo:
alias: data.leonardo.cineca.it
hostnames and IPs:
dmover1.leonardo.cineca.it - 131.175.44.50
dmover2.leonardo.cineca.it - 131.175.44.51
dmover3.leonardo.cineca.it - 131.175.44.52
dmover4.leonardo.cineca.it - 131.175.44.53
Pitagora:
alias: data.pitagora.cineca.it
hostnames and IPs:
dmover01.pitagora.cineca.it - 130.186.16.214
dmover02.pitagora.cineca.it - 130.186.16.215
dmover03.pitagora.cineca.it - 130.186.16.216
dmover04.pitagora.cineca.it - 130.186.16.217
Main features
This transfer service is containerized, and there are many differences between these nodes and the login nodes.
First of all, on datamovers, there is no CPU time limit, that allows long data transfers. Unlike, on login nodes, there is a 10-minute of CPU time limit that usually interrupts the transfer of a large amount of data. By construction, the shell is not available, so it is not possible to open interactive sessions. In other words you cannot connect directly to the datamover via SSH. The only available commands are scp, rsync, sftp, wget, curl, rclone, s3 and aws s3. However, the authentication is still based on SSH protocol. There are only 2 possible authentication methods:
publickey: it only accepts valid SSH certificates, obtained via 2-Factor Authentication. No private/public keys generated in other ways are accepted.
hostbased: if you are already logged into a CINECA HPC cluster and try to use a datamover from a login node, the SSH daemon on the datamover recognizes you are already authenticated on a CINECA HPC cluster and that is enough.
Warning
The host-based authentication is not enabled inside a job batch. If you want to use a datamover inside a job batch you have to copy a valid 2FA SSH certificate inside your ~/.ssh directory on the cluster where you are submitting the job batch.
Important
When you are authenticated on a datamover, the environment variables $HOME, $WORK and $CINECA_SCRATCH (as well as ~ or * ) are not defined.
This property has 2 side effects:
if you want to transfer files FROM/TO your cluster personal areas, you have to specify the absolute path of them.
You cannot make use of the SSH configuration files stored in your remote ~/.ssh/ directory (such as $HOME/.ssh/config).
Listing Directory via sftp
If you need to list files on a cluster where login nodes are offline, you can rely on datamover service via the sftp command:
sftp <username>@data.<cluster_name>.cineca.it:/path/to/be/listed/
Connected to data.<cluster_name>.cineca.it
Changing to: /path/to/be/listed/
sftp>
One entered the sftp session, the familiar pwd, cd /path/to/, ls commads are available to explore the remote filesystem, together with the sftp command lpwd, lcd /path/to/, lls. You can also transfer data from the sftp session, see the appropriate section below.
Available transfer tools
rsync
There are 2 possible ways to use rsync via datamovers:
You need to upload or download data FROM/TO your local machine TO/FROM a CINECA HPC cluster
rsync -PravzHS /absolute/path/from/file <username>@data.<cluster_name>.cineca.it:/absolute/path/to/
rsync -PravzHS <username>@data.<cluster_name>.cineca.it:/absolute/path/from/file /absolute/path/to/
You need to transfer files between 2 CINECA HPC clusters
ssh -xt <username>@data.<cluster_name_1>.cineca.it rsync -PravzHS /absolute/path/from/file <username>@data.<cluster_name_2>.cineca.it:/absolute/path/to/
ssh -xt <username>@data.<cluster_name_1>.cineca.it rsync -PravzHS <username>@data.<cluster_name_2>.cineca.it:/absolute/path/from/file  /absolute/path/to/
scp
There are 3 possible ways to use scp via datamovers:
You need to upload or download data FROM/TO your local machine TO/FROM a CINECA HPC cluster
scp /absolute/path/from/file <username>@data.<cluster_name>.cineca.it:/absolute/path/to/
scp  <username>@data.<cluster_name>.cineca.it:/absolute/path/from/file /absolute/path/to/
You need to transfer files between 2 CINECA HPC clusters
ssh -xt <username>@data.<cluster_name_1>.cineca.it scp /absolute/path/from/file <username>@data.<cluster_name_2>.cineca.it:/absolute/path/to/
ssh -xt <username>@data.<cluster_name_1>.cineca.it scp <username>@data.<cluster_name_2>.cineca.it:/absolute/path/from/file  /absolute/path/to/
You need to transfer files between 2 CINECA HPC clusters using your local machine as a bridge. We strongly suggest not using this option because it has very low transfer performance, each file you move from one cluster to another will pass through your local machine
scp -3 <username>@data.<clusterr_name_1>.cineca.it:/absolute/path/from/file data.<cluster_name_2>.cineca.it:/absolute/path/from/filesftp
There are 2 possible ways to use sftp via datamovers:
You need to upload or download data FROM/TO your local machine TO/FROM a CINECA HPC cluster
sftp <username>@data.<cluster_name>.cineca.it:/absolute/remote/path/to/
sftp> put relative/local/path/to/file
Uploading /absolute/local/path/to/file to /absolute/remote/path/to/file
file                                                                                                 100%  414   365.7KB/s   00:00
sftp> get relative/remote/path/to/file
Fetching /absolute/remote/path/to/file to file
file                                                                                                 100% 1455KB  19.0MB/s   00:00
sftp>
You need to transfer files between 2 CINECA HPC clusters
ssh -xt <username>@data.<cluster_name_1>.cineca.it sftp <username>@data.<cluster_name_2>.cineca.it:/absolute/path/to/It is also possible to use the flag -b and execute sftp in batch mode.
wget
Sometimes, the 10-minute CPU time limit or the 4-hour wall time limit on the serial queue is not enough to download a large dataset for ML. In this case, you can use wget from the datamover. Here you can find a simple example
ssh -xt <username>@data.<cluster_name>.cineca.it wget http://ftp.gnu.org/gnu/wget/wget2-2.0.0.tar.gz -P /absolute/path/to/Please note that is mandatory to use the flag -P with the absolute path of the destination folder, because of the fake /home directory.
curl
Sometimes, the 10-minute CPU time limit or the 4-hour wall time limit on the serial queue is not enough to download a large dataset for ML. In this case, you can use curl from the datamover. Here you can find a simple example
ssh -xt <username>@data.<cluster_name>.cineca.it curl https://curl.se/download/curl-8.2.1.tar.gz --output /absolute/path/to/curl-8.2.1.tar.gzPlease note that is mandatory to use the flag –output with the absolute path of the destination file, because of the fake /home directory.
rclone
Rclone is a powerful tool that supports different transfer protocols, and a lot of data [providers](https://rclone.org/#providers). It needs a configuration file. If you are able, you car write the configuration file using your favourite editor (VIM) or you can rely on the rclone config command:
ssh -xt <username>@data.<cluster_name>.cineca.it rclone --config /<cluster_name>/home/userexternal/<username>/.rclone.conf configWhen your configuration is ready you can use rclone to manage data between the <cluster_name> filesystems and the remote host you have configures. For example:
ssh -xt <username>@data.<cluster_name>.cineca.it rclone --config /<cluster_name>/home/userexternal/<username>/.rclone.conf copy /absolute/path/to/{file|directory} my_remote:
ssh -xt <username>@data.<cluster_name>.cineca.it rclone --config /<cluster_name>/home/userexternal/<username>/.rclone.conf move my_remote:{file|directory} /absolute/path/to/{file|directory}
ssh -xt <username>@data.<cluster_name>.cineca.it rclone --config /<cluster_name>/home/userexternal/<username>/.rclone.conf sync /absolute/path/to/directory my_remote:remote/directory
Please note that is mandatory to use the flag –config with the absolute path of the config file, because of the fake /home directory.
aws s3
AWS is the official command line tool from Amazon to manage s3 buckets. You can use only the s3 service, no other service are allowed at the moment. We discourage you to use ~/.aws/credentials and ~/.aws/config for two reasons:
for security reason, it is not a good idea writing secrets on a shared filesystem
there is a fake home on the datamover /home and the users cannot write inside any configuration file.
We strongly suggest to define the environment variables AWS_ACCESS_KEY_ID and AWS_SECRET_ACCESS_KEY on your local computer and use the ssh option “SendEnv” to export them on the datamovers.
AWS_ACCESS_KEY_ID="<access key id>" AWS_SECRET_ACCESS_KEY="<secret access key>" ssh -xt -o "sendEnv=AWS_*" <username>@data.<cluster_name>.cineca.it aws s3 ls s3://<bucket name>
AWS_ACCESS_KEY_ID="<access key id>" AWS_SECRET_ACCESS_KEY="<secret access key>" ssh -xt -o "sendEnv=AWS_*" <username>@data.<cluster_name>.cineca.it aws s3 sync /absolute/path/to/ s3://<bucket name>
AWS_ACCESS_KEY_ID="<access key id>" AWS_SECRET_ACCESS_KEY="<secret access key>" ssh -xt -o "sendEnv=AWS_*" <username>@data.<cluster_name>.cineca.it aws s3 cp s3://<bucket name>  /absolute/path/to/
s3
On all datamovers it is available also the s3 command from the libs3 system package. Here you can find the git repo, https://github.com/bji/libs3. Since it is not possible to define environment variable on the datamover, it is mandatory to set the environment variable S3_ACCESS_KEY_ID and S3_SECRET_ACCESS_KEY and send these environment to the datamovers, using the ssh option “SendEnv=S3_*”. Our suggestion is to define this option in the local ssh_config file. We strongly discourage to define these variable inside a file on the Leonardo filesystem, for security reason.
Usage examples:
ssh -xt <username>@<cluster_name>.leonardo.cineca.it s3 help
S3_ACCESS_KEY_ID="<access key id>" S3_SECRET_ACCESS_KEY="<secret access key>" ssh -xt -o "SendEnv=S3_*" <username>@data.<cluster_name>.cineca.it  s3 test s3://<bucket name>
S3_ACCESS_KEY_ID="<access key id>" S3_SECRET_ACCESS_KEY="<secret access key>" ssh -xt -o "SendEnv=S3_*" <username>@data.<cluster_name>.cineca.it  s3 put s3://<bucket name> filename=/absolute/path/to/{file|directory}
S3_ACCESS_KEY_ID="<access key id>" S3_SECRET_ACCESS_KEY="<secret access key>" ssh -xt -o "SendEnv=S3_*" <username>@data.<cluster_name>.cineca.it  s3 get s3://<bucket name> filename=/absolute/path/to/{file|directory}
Tip
A key use case involves transferring data to and from CINECA clusters and external systems (for example, another HPC cluster). To enable this, users must load valid SSH certificates, obtained via 2-Factor Authentication, into the SSH agent on the remote system.
Usage examples:
ssh -A <username>@<remote system>
Once connected, users can follow the same procedures described in the “Transferring data from/to your local machine to/from a CINECA HPC cluster” section.
Introduction
In this section, we shall provide an easy way to transfer data to and from any CINECA clusters using GridFTP protocol via globus-url-copy client.
GridFTP is a highly efficient and robust protocol designed for transferring large volumes of data, significantly enhancing the standard FTP service by providing faster and more reliable transfers. It is widely used in large-scale scientific projects and supercomputing centers due to its ability to handle very large files securely and efficiently.
Key features of GridFTP include:
Multiple simultaneous TCP streams: Maximizes bandwidth utilization by allowing parallel downloads from multiple sources or striped/interleaved transfers.
Partial file transfers: Enables downloading specific portions of large files, useful for scientific data processing.
Fault tolerance and automatic restart: Resumes interrupted transfers from the last successful byte to improve reliability over unstable networks.
Security integration: Supports Grid Security Infrastructure (GSI), Kerberos, and SSH-based authentication, encryption, and data integrity.
TCP buffer/window size negotiation: Optimizes transfer speed and reliability based on file size and network conditions.
Cluster-to-cluster transfers: Uses multiple nodes at source and destination to increase transfer performance.
Data channel reuse: Avoids repeated connection setups when transferring multiple files between the same endpoints.
Third-party control: Allows secure initiation of transfers between remote sites without the client being directly involved in the data path.
The command-line utility used to perform GridFTP transfers is called globus-url-copy.
Since 2018, the client software globus-url-copy can be installed via packages from the Grid Community Forum (GridCF), a global community supporting core grid software.
GridCF maintains the Grid Community Toolkit (GCT), an open-source fork of the original Globus Toolkit developed by the Globus Alliance.
Although GCT is derived from the Globus Toolkit, it is a distinct project, and GridCF operates independently from the Globus Alliance.
Example usage:
User Local PC <==> CINECA HPC Cluster
CINECA HPC Cluster A <==> CINECA HPC Cluster B
CINECA HPC Cluster <==> Other site HPC Cluster
How to install standard client on your local workstation
The following instructions applies to both Debian/Ubuntu users and Windows users running WSL1 or WSL2.
sudo apt install globus-gass-copy-progs
Otherwise, if you are a RedHat/Fedora user, execute the following command to install the client:
sudo dnf install globus-gass-copy-progs
For detailed installation guidance, users are directed to the official Grid Community Toolkit documentation at https://gridcf.org/gct-docs/.
Authentication to the service
The authentication process is delegated to SSH, which manages secure user authentication through mechanisms such as public key cryptography and, in CINECA’s case, enhanced with two-factor authentication.
For this reason, you have to generate the ssh certificate on your workstation using the step client, via:
step ssh login '<EMAIL USER>' --provisioner cineca-hpc
For more info please refer to the page How to configure smallstep client and How to activate the 2FA and the OTP generator.
Note
For data transfers between a CINECA HPC cluster and an external HPC site, please ensure that the appropriate external access method is verified and properly configured.
Use the standard client
From the workstation with the ssh certificate, you may transfer data from CINECA HPC Cluster A to CINECA HPC Cluster B by using the standard client globus-url-copy.
globus-url-copy -vb -cd sshftp://<username>@gftp.<cluster_name_1>.cineca.it:22/absolute/path/from/directory/ \
                        sshftp://<username>@gftp.<cluster_name_2>.cineca.it:22/absolute/path/to/
In addition, you may list files in a specific cluster by the command:
globus-url-copy -list sshftp://<username>@gftp.<cluster_name>.cineca.it:22/absolute/path/from/directory/Warning
Do not switch off the workstation during data transfer!
Client process is hosted on your workstation: switching it off, will kill data transfer process.
You may also transfer data FROM/TO local machine TO/FROM a CINECA HPC cluster, via:
globus-url-copy -vb -cd /absolute/path/from/directory/    sshftp://<username>@gftp.<cluster_name>.cineca.it:22/absolute/path/to/

globus-url-copy -vb -cd sshftp://<username>@gftp.<cluster_name>.cineca.it:22/absolute/path/from/directory/       /absolute/path/to/
where <cluster_name> can be: g100 or leonardo.
For more info about globus-url-copy command please refer to the official guide, or simply use the command line help:
globus-url-copy -help
man globus-url-copy
GridFTP TCP Port Range configuration
Please note that GridFTP servers on our clusters are configured to use the port range 20000 - 25000 for the incoming and outgoing connections.
Endianness
Endianness is the attribute of a system that indicates whether integers are represented from left to right or right to left. At present, all clusters in Cineca are “little-endian”.