Database: create
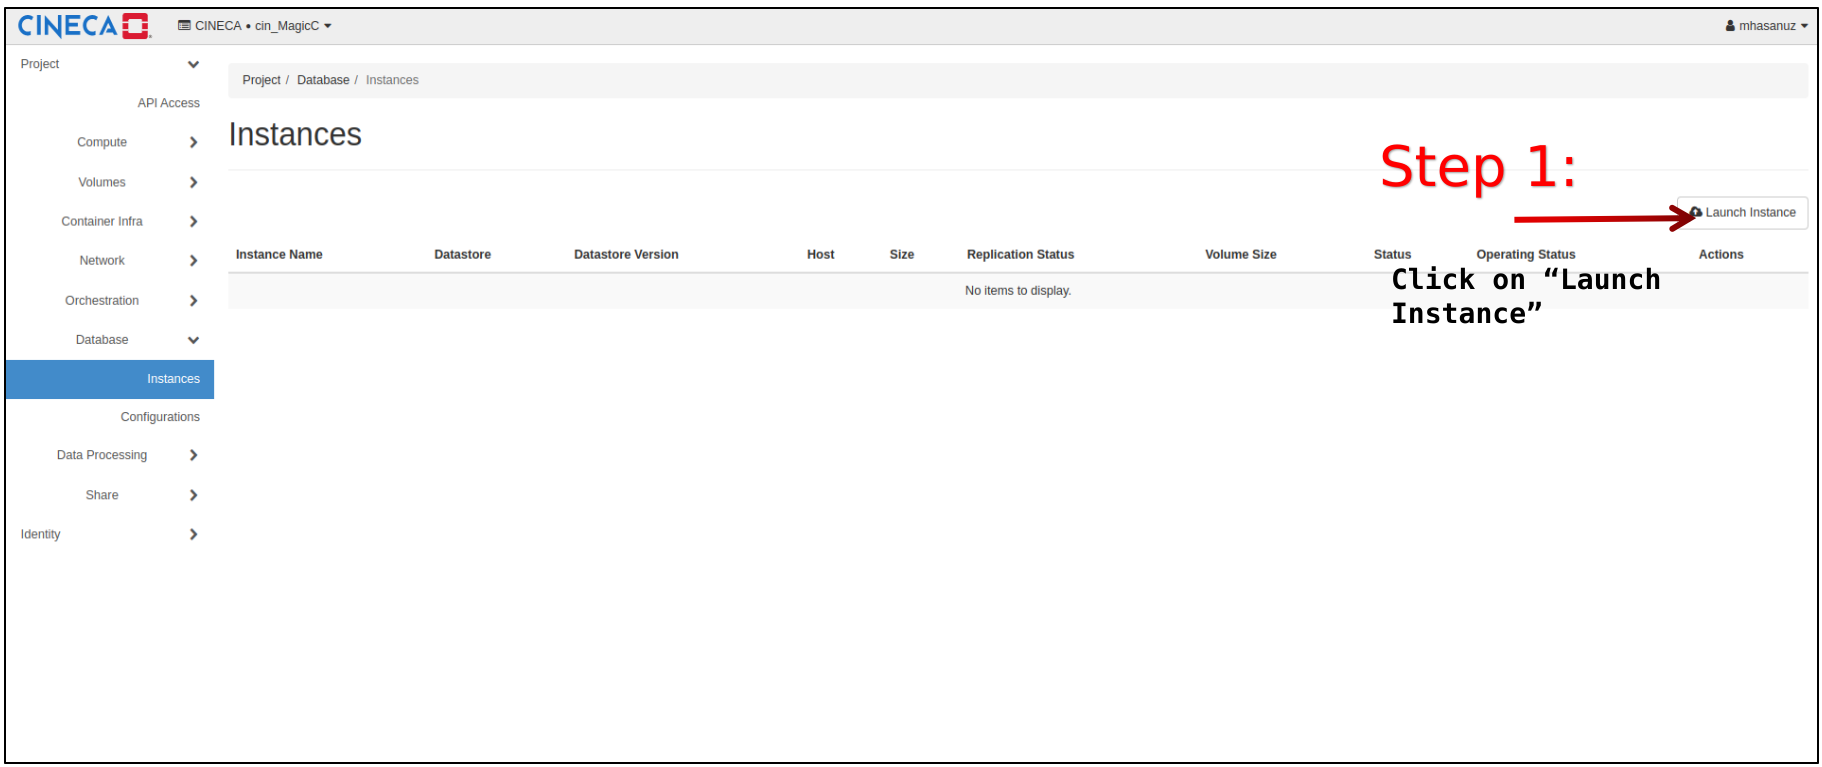
Click on “Database → Instances → Launch Instance”
Fill in the fields described below for the different tabs
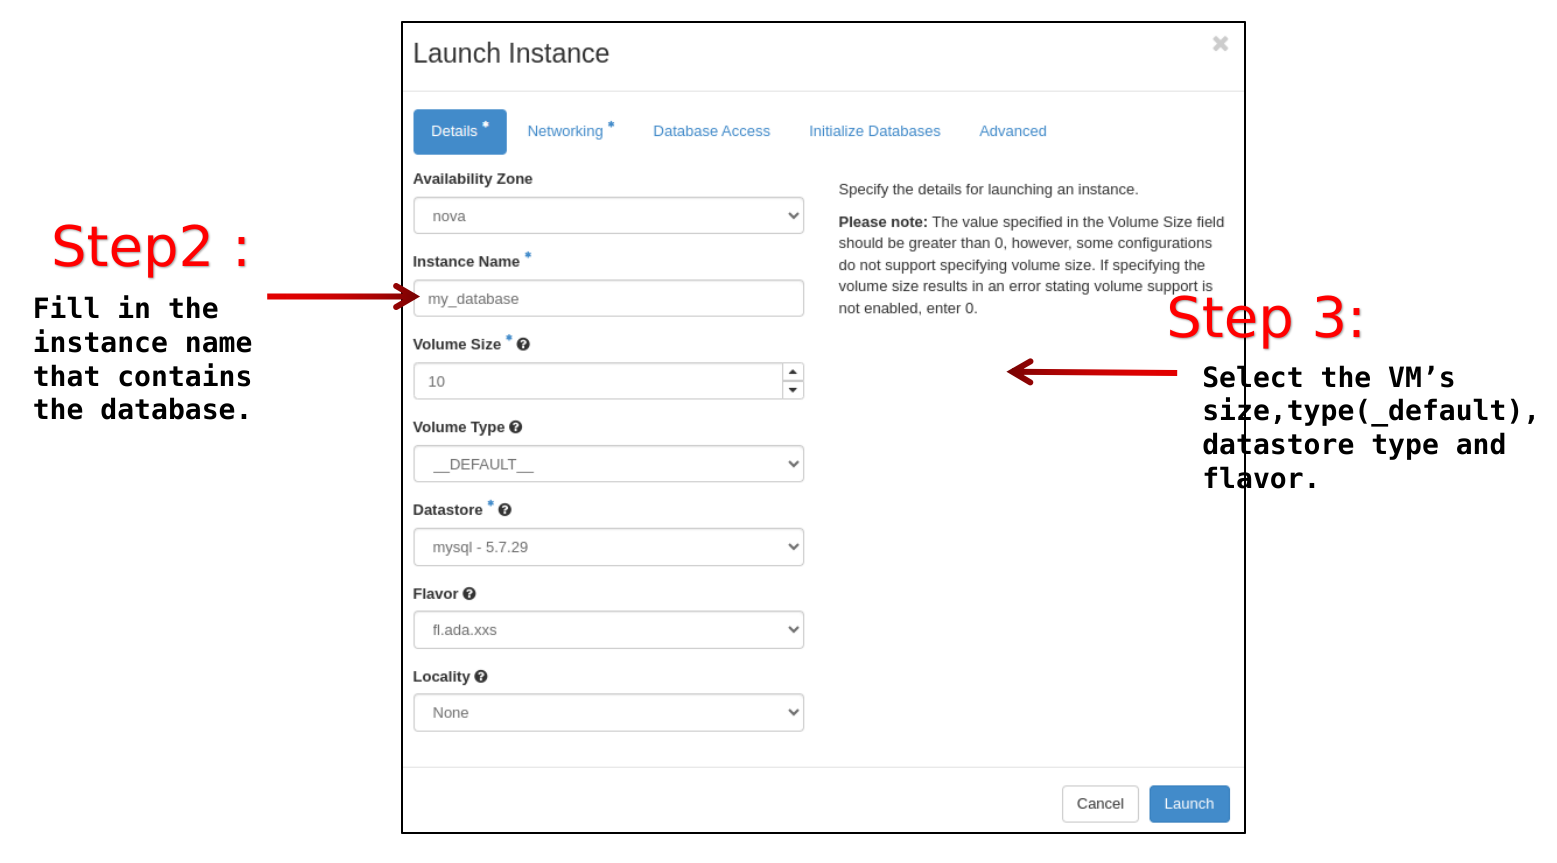
Details tab
Availability Zone: nova
Instance Name: <the name you prefer>
Volume Size: <size in GB for the volume that will contain the databases>. By default the maximum allowed is 10 GB.
Volume Type: choose between “__DEFAULT__” or “LUKS”. The second one is for encrypted volumes.
Datastore: choose among the available datastores. They are listed in the drop-down menu showing also the available versions.
Flavor: it is the dimension of the VM that will have the database volume attached. Insert fl.ada.xxs, since you will not be allowed by design to login into this VM.
Locality: None
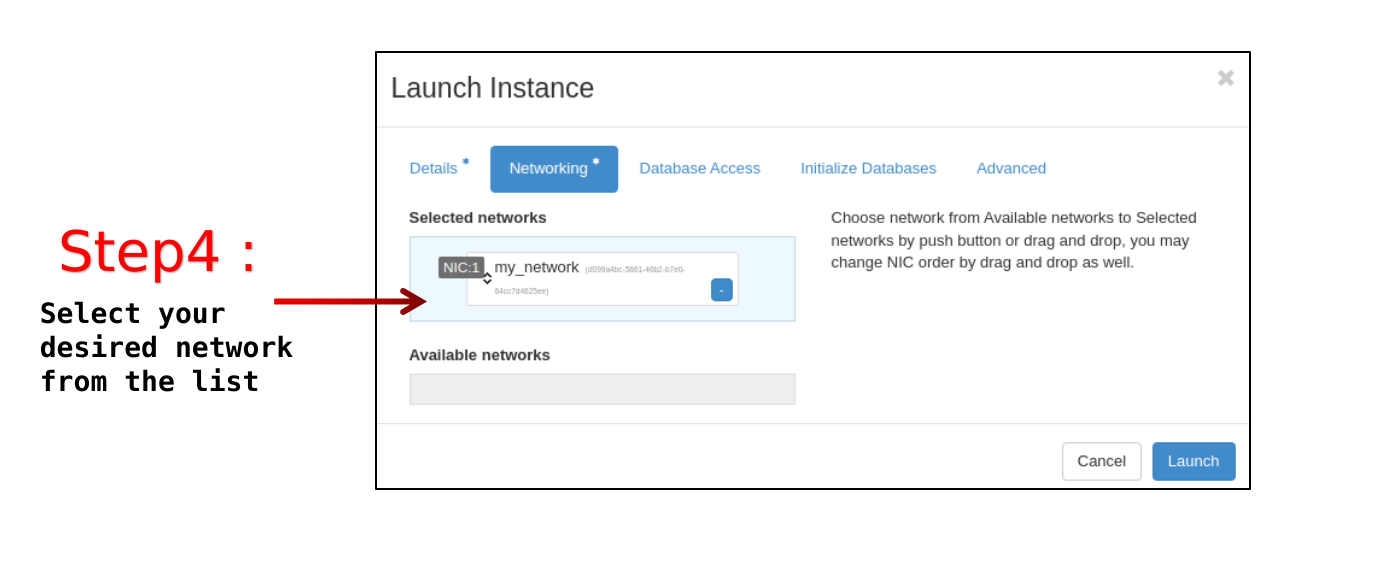
Networking tab
Selected networks: <network_name>, choose one among the available network in the project.
Make sure to create the network before creating the database instance (see Network: create).
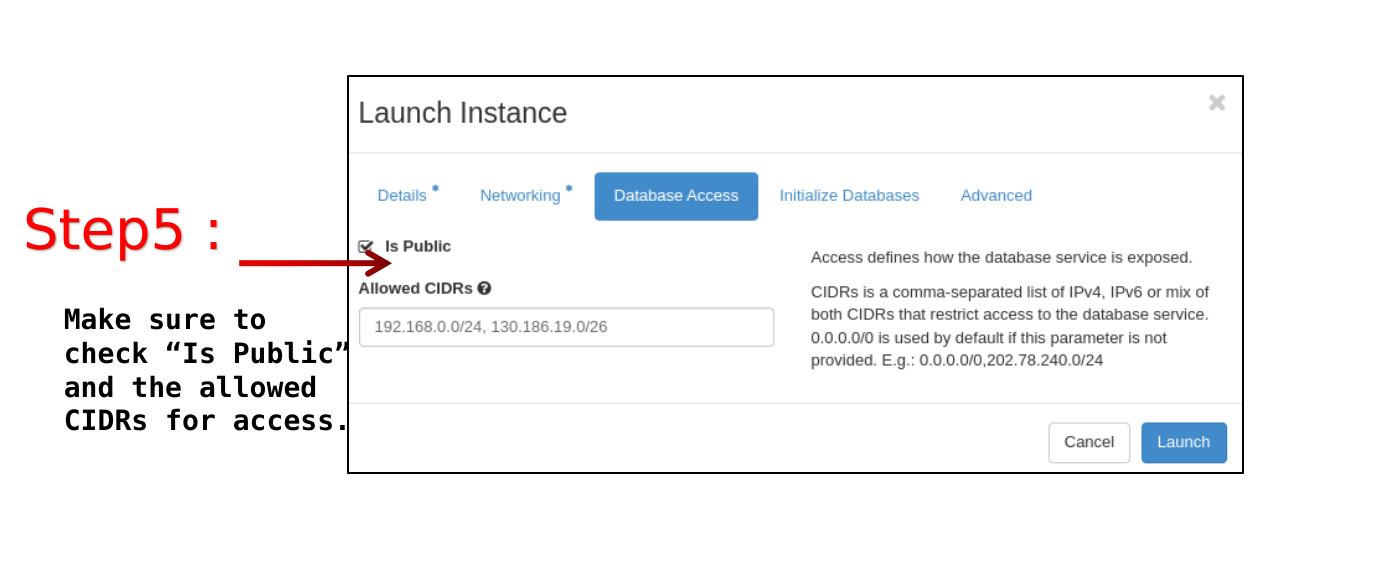
Database access tab
Is public: Check this box if you want to allow access to the database instance from the public network; otherwise leave blank.
Allowed CIDRs: <xx.xx.xx.xx./y>. Specify the allowed IP or IP-ranges from which to access the database service.
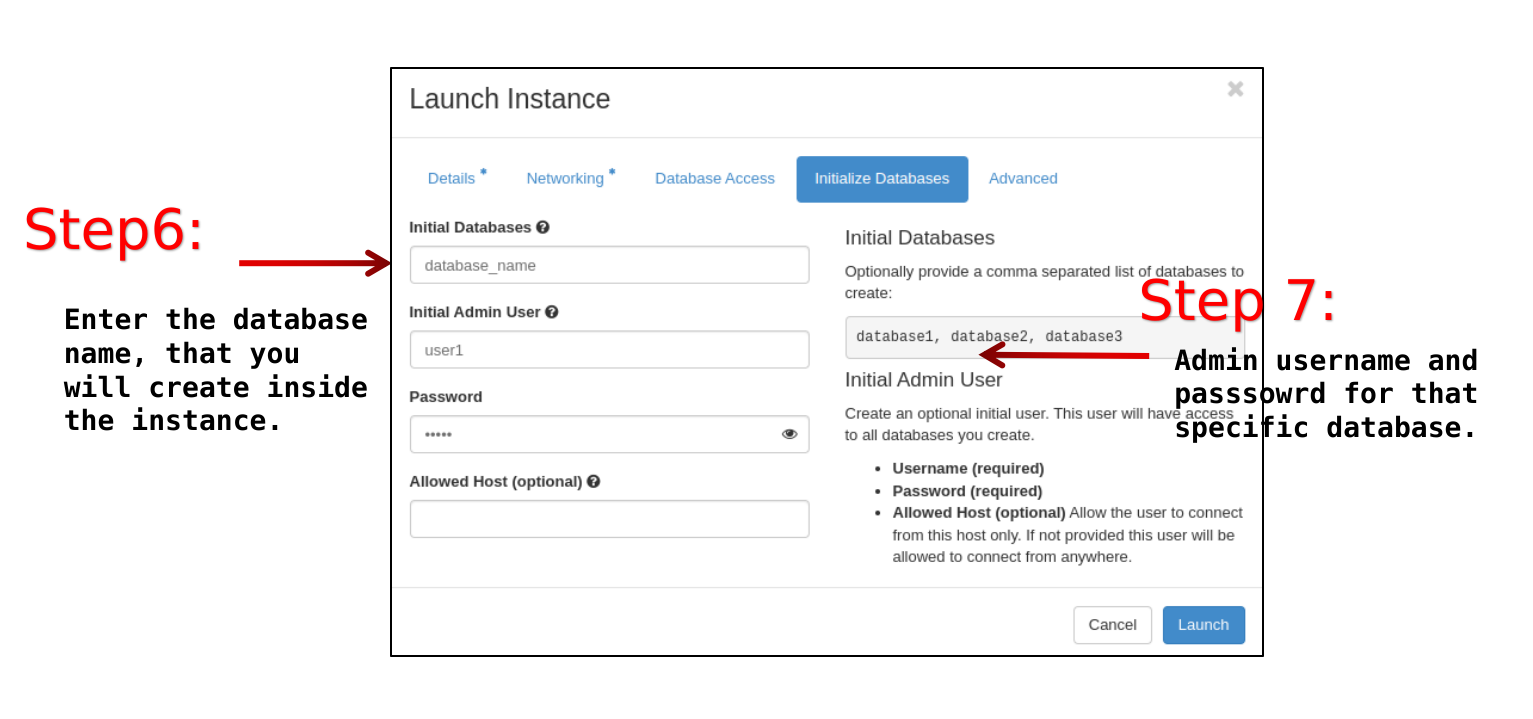
Initialize Databases tab
Initial Databases: <the name you want, for the first databases that will be created>. Note that additional databases can be created later.
Initial Admin Users: <the username for the admin database user>
Password: <the password for the database admin user>
Allowed Hosts: optional value, to further restrict for this specific database the allowed Host or IP addresses able to connect to the database.
Advanced tab
Configuration Group and Source from Initial State: Fill these two fields only if you want to create the database using a previous backup, or as a replica of an other database instance.
Replica Count: fill in this field only if you want to have multiple replicas of this database instance.

At the end, click on “Launch” on the right bottom to launch the Database instance.
To access the created database you can refer to dedicated page Accessing the Database instance
Important
Software required
To use Command Line Interface, the following additional packages are needed. It is recommended to install these packages in a virtual environment.
pip install python-openstackclient==5.8.0
pip install python-troveclient
For more information, see python-troveclient, a command-line client for the Trove API.
Setting up the environment variables
Make sure to have a valid Application Credential for the project. Please refer to the Application credentials creation page where it is described how to get OpenStack Application Credentials.
Create the database instance
To create a database instance, you need to execute a command as openstack database instance create <DB-INST-NAME> specifying at least the following parameters:
name: The name of the database instance.
flavor: The flavor of the database instance. Insert fl.ada.xxs, since you will not be allowed by design to login into this VM.
datastore: The datastore of the database instance.
datastore-version: The version of the datastore to use.
size: The size of the instance disk volume in GB. By default the maximum allowed is 10 GB.
nic: The network interface card of the database instance.
net-id: The network id of the database instance.
allowed-cidr: The allowed cidr of the database instance. It is an IP or a range of IPs from which the database instance can be accessed.
database: The name of the initial database.
users: The username and password of the admin user in the database.
is-public: Add this flag to be able to access the database from internet. Otherwise, the database will be accessible only from an other VM present in the same network of the project.
For the full list of options please type the command: openstack database instance create --help.
Make sure to create a network stack (Network: create) and copy the id of the network before creating a database instance.
The example below shows how to create a database instance:
openstack database instance create MyTroveDB --flavor fl.ada.xxs --datastore mysql --datastore-version 5.7.29 --size 10 --nic net-id=<network-id> \
--databases test --is-public --users <user-name>:<password> --allowed-cidr xx.xx.xx.xx/y

+--------------------------+--------------------------------------+
| Field                    | Value                                |
+--------------------------+--------------------------------------+
| allowed_cidrs            | [xx.xx.xx.xx/y]                      |
| created                  | 2023-03-30T10:09:46                  |
| datastore                | mysql                                |
| datastore_version        | 5.7.29                               |
| datastore_version_number | 5.7.29                               |
| flavor                   | 3496e9e0-60c4-471a-99ce-51f3d0a8048b |
| id                       | --- the ID of the DB instance        |
| name                     | MyTroveDB                            |
| operating_status         |                                      |
| public                   | True                                 |
| region                   | RegionOne                            |
| service_status_updated   | 2023-03-30T10:09:46                  |
| status                   | BUILD                                |
| updated                  | 2023-03-30T10:09:46                  |
| volume                   | 10                                   |
+--------------------------+--------------------------------------+
Once created, successfully,
if the flag “–is-public” is specified, you will be provided with a public IP (also referred to as Floating IP) address attached to the database instance. You can use this IP address to reach the database instance from the internet.
Otherwise, only the IP of the internal network of the project will be presented.
The allowed-cidr address will determine whether the database/s can be accessed from outside of the network. If the user wants to access the database from another VM in the same network then the user has to specify the CIDR of the network where the VM belongs to, whereas, for public internet access, the user has to specify the CIDR of the public network (for example 0.0.0.0/0 for all internet or a sub-range).
Check the status of the database instance
To check the status of a database instance, please use the following commands:
$ openstack database instance list    # will list all the database instances present in the cluster

+--------------------------------------+-----------------+-----------+-------------------+--------+------------------+--------+----------------------------------------------------------------------------------------------------+--------------------------------------+------+------+
| ID                                   | Name            | Datastore | Datastore Version | Status | Operating Status | Public | Addresses                                                                                          | Flavor ID                            | Size | Role |
+--------------------------------------+-----------------+-----------+-------------------+--------+------------------+--------+----------------------------------------------------------------------------------------------------+--------------------------------------+------+------+
| <id-of-the-database-instance>        | MyTroveDB       | mysql     | 5.7.29            | ACTIVE | HEALTHY          | True   | [{'address': 'xx.xx.xx.xx', 'type': 'private'}, {'address': 'xx.xx.xx.xx', 'type': 'public'}]      | 7595d735-6de4-415f-a958-838089a09080 |   10 |      |
+--------------------------------------+-----------------+-----------+-------------------+--------+------------------+--------+----------------------------------------------------------------------------------------------------+--------------------------------------+------+------+
With the ID of the database instance just created, you can check its status with the following command:
$ openstack database instance show <id-of-the-database-instance>

+--------------------------+-----------------------------------------------------------------------------------------------------+
| Field                    | Value                                                                                               |
+--------------------------+-----------------------------------------------------------------------------------------------------+
| addresses                | [{'address': 'xx.xx.xx.xx', 'type': 'private'}, {'address': 'xx.xx.xx.xx', 'type': 'public'}]       |
| allowed_cidrs            | ['xx.xx.xx.xx/y', 'xx.xx.xx.xx/y']                                                                  |
| created                  | 2023-06-09T09:19:11                                                                                 |
| datastore                | mysql                                                                                               |
| datastore_version        | 5.7.29                                                                                              |
| datastore_version_number | 5.7.29                                                                                              |
| flavor                   | 7595d735-6de4-415f-a958-838089a09080                                                                |
| id                       | --- the ID of the DB instance                                                                       |
| ip                       | xx.xx.xx.xx, xx.xx.xx.xx                                                                            |
| name                     | MyTroveDB                                                                                           |
| operating_status         | HEALTHY                                                                                             |
| public                   | True                                                                                                |
| region                   | RegionOne                                                                                           |
| service_status_updated   | 2023-06-09T09:22:21                                                                                 |
| status                   | ACTIVE                                                                                              |
| updated                  | 2023-06-09T09:20:48                                                                                 |
| volume                   | 10                                                                                                  |
| volume_used              | 0.22                                                                                                |
+--------------------------+-----------------------------------------------------------------------------------------------------+
Also, check the status and the operating_status. If the status is ACTIVE, then the database instance is ready to use. It may takes some time to get the database instance in ACTIVE state after being created.
To access the created database you can refer to dedicated page Accessing the Database instance