Load balancer: create
We exemplify here the procedures based on (1) Horizon Dashboard and (2) the Command Line Interface together wuth the OpenStack Octavia plugin, for a simple use case: the deployment of a basic HTTP load balancer with an associated floating IP.
For further details and additional use cases, including step-by-step examples, refer to the Octavia Basic Load Balancing Cookbook. This resource provides comprehensive instructions on applying an analogous procedure to various scenarios.
Important
The Octavia service is available but it is not enabled by default to all HPC Cloud projects.
If you want to use it, please request access by sending an email to superc@cineca.it.
Once the tenant is enabled to the service by the User Support Team, all users of the tenant will be able to use the service.
In this section, we will walk you through the steps to create a setup where two instances running nginx servers are connected to an HTTP load balancer. The load balancer will use the round-robin algorithm to evenly distribute incoming HTTP traffic across the two servers.
Important
Before creating a load balancer, ensure that the following resources are available in your tenant:
1 network and subnet where both VMs and the load balancer will be connected.
1 router (gateway to the external network) used to bridge the internal subnet with the external network, enabling Floating IP access.
A security group with an Ingress rule to allow connections from the entire internal network (where both VMs and the load balancer are located) via HTTP (port 80) and SSH (port 22) to the BMs.
A security group with an Ingress rule to allow connections from the external network via SSH (port 22) to one VM. This server is the one with an associated floating-IP.
2 instances. In our example, these VMs host an nginx web server each.
At least 2 floating IPs: one associated to one of the VMs, that we will use to start the nginx servers, and an additional one available to be associated to the load balancer. The internal IP of the second VM can be used to login from the first VM if needed for configuration. Note that an additional floating IP could be directly associated to the second VM. However, this would entail using an additional (and not strictly necessary) resource, which we try to avoid.
1 KeyPair: an SSH public key is needed to access the instances for their configuration.
You can setup a very simple nginx web server in each VM by logging into each of the VM and running the following commands on the shell:
sudo apt-get update
sudo apt-get install -y nginx && \
    echo "Hello! This is $(hostname)" > /var/www/html/index.html
Note
For the correct functioning of the load balancer, it is necessary to open the port on which the service is exposed (in our example, port 80) to the entire internal network where the load balancer and the VMs are located.
This can be done by adding an Ingress rule to the security group associated to the VMs.
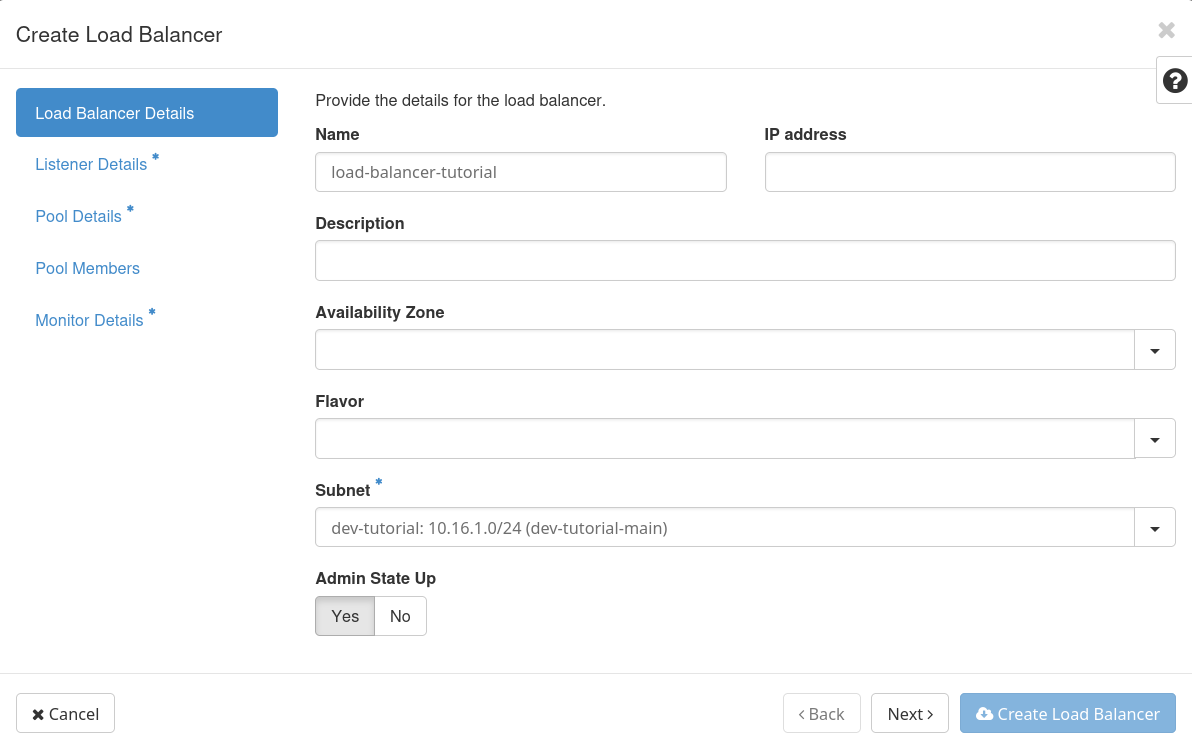
Create the load balancer by clicking on “Network → Load Balancers → Create Load Balancer” and setting the following information. Once all the details are provided, click on “Create Load Balancer”.
Load Balancer Details
Name. Give a name to the load balancer.
Subnet. Select the desired subnet.
Listener Details
Name. Give a name to the listener.
Protocol and port. The protocol defines the type of network traffic the listener will handle, while the port specifies the network port on which the listener will accept incoming traffic. In our example, we select protocol HTTP and port 80.
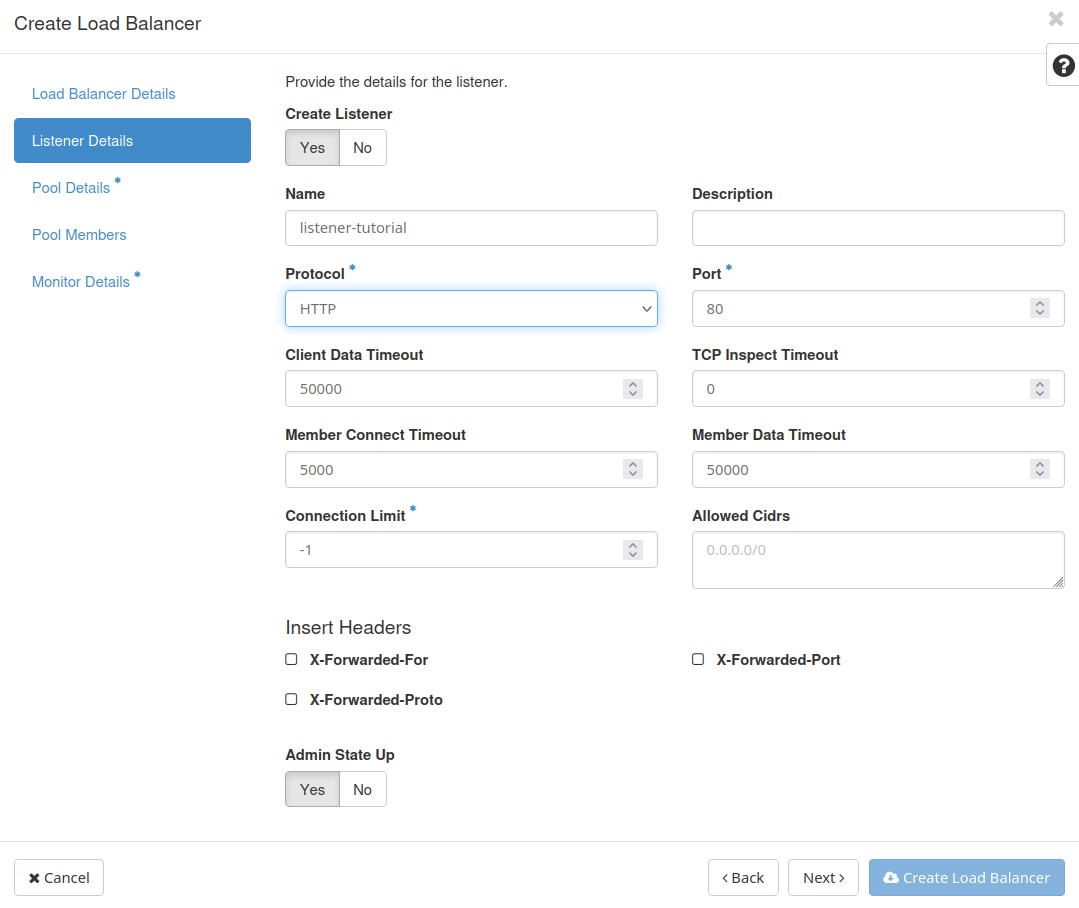
Note
When using TCP-based listeners (e.g. for SSH), idle (inactive) connections may be automatically closed after a period of inactivity depending on the load balancer configuration. This is expected behavior and does not indicate a failure.
The timeout can be adjusted via the client_data_timeout parameter of the listener. Alternatively, enabling keepalive on the client side (e.g.
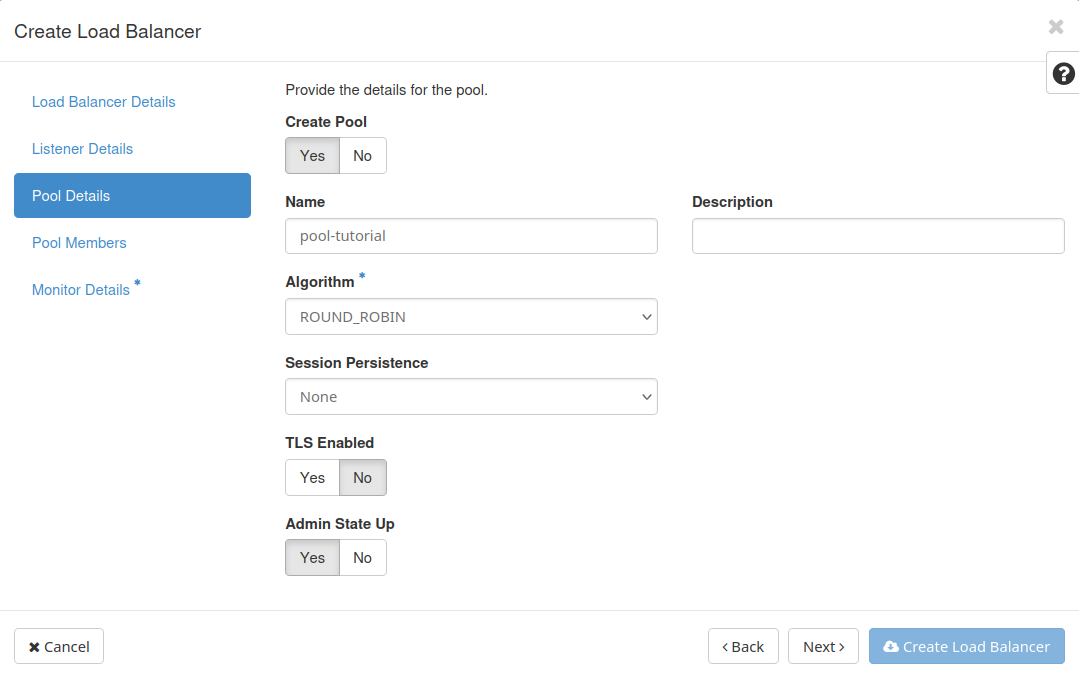
ServerAliveIntervalin SSH) can help maintain long-lived sessions.Pool Details
Name. Give a name to the pool.
Algorithm. The algorithm determines how traffic is distributed across the members. We select ROUND_ROBIN.
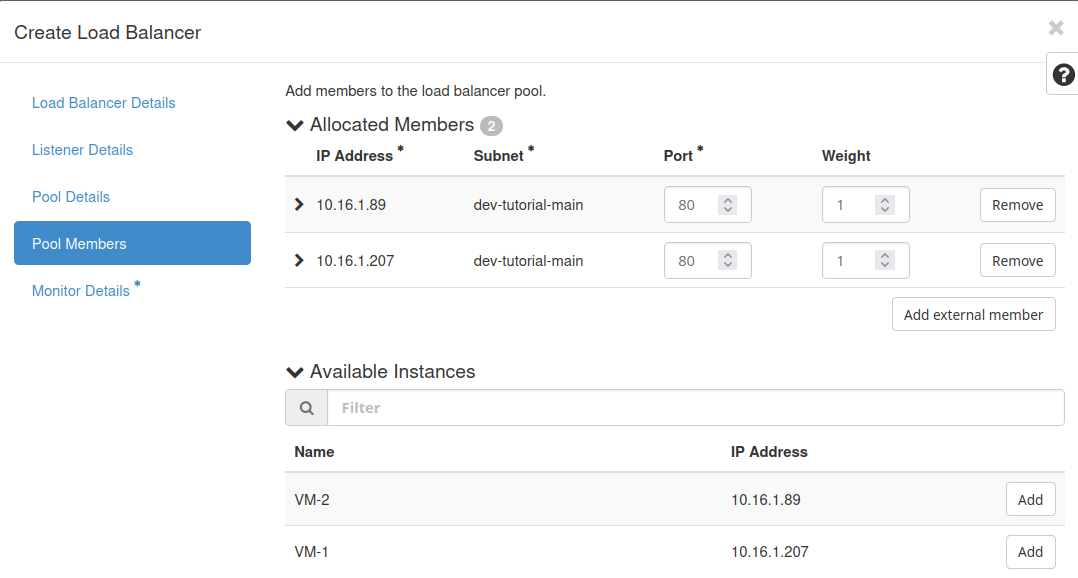
Pool Members
Add members. Choose the desired members among those available. We add VM-1 and VM-2, the names of the VMs in our example.
Port. For each VM, specify the port number on which the member will receive traffic. In our case, we expose the nginx server on port 80.
Weight. The weight of the member for load balancing purposes. The weight determines the relative portion of requests the member should handle compared to others. We use the default value.
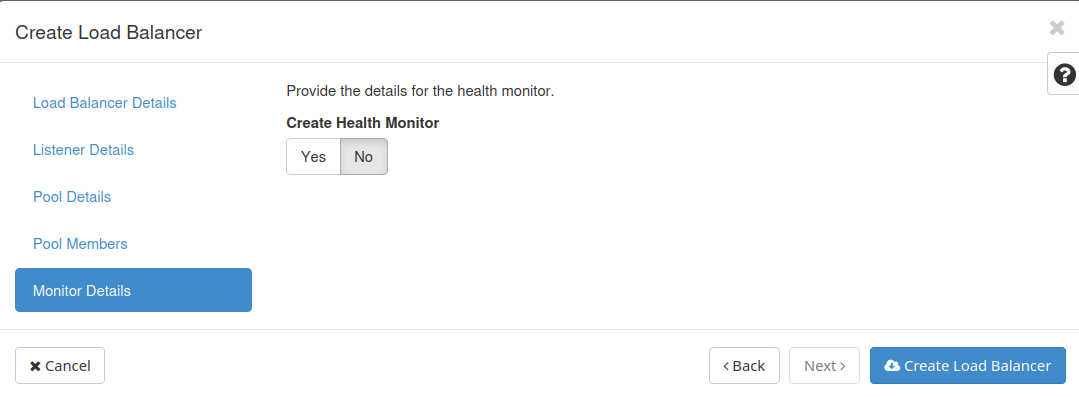
Monitor Details
Decide whether you would like to create a health monitor and configure it, if needed. In this example, we will not make use of a monitor.
Associate a floating IP to the load balancer.
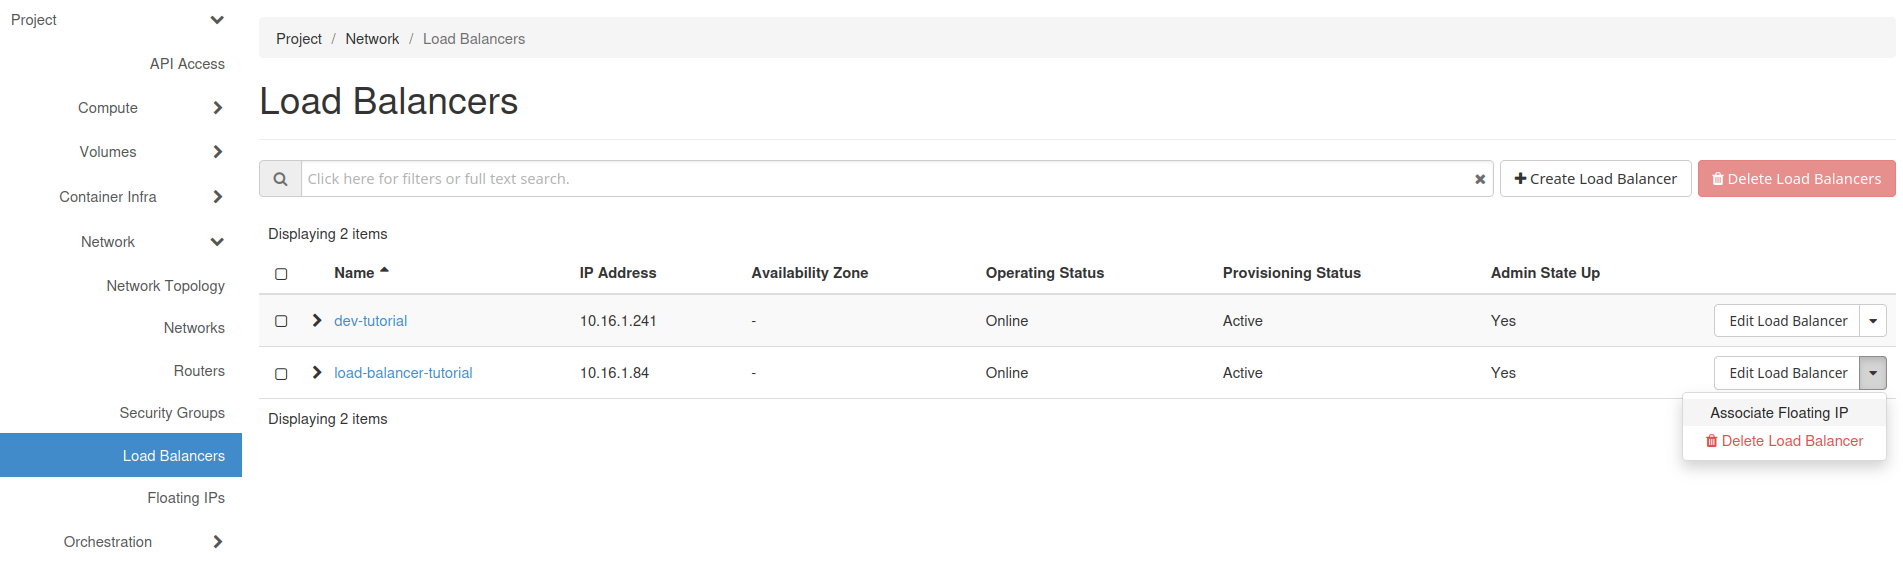
Move to the “Network → Load Balancers” section.
Display the options within the drop-down menu on the right side for the desired load balancer, and click on “Associate Floating IP”.
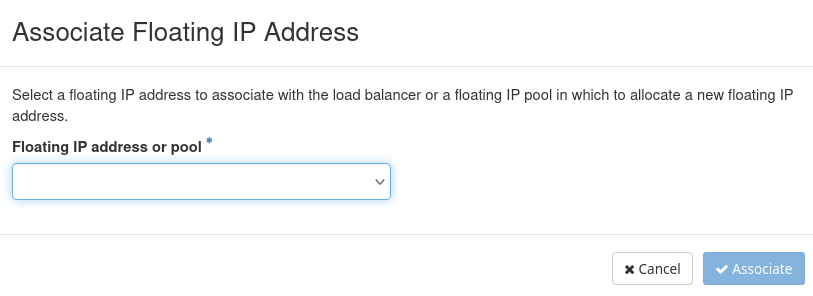
Select the floating IP among those suggested in the drop-down menu “Floating IP address or Pool” and click on “Associate”.
The floating IP associated to the load balancer appears in the overview of its characteristics. In order to see the properties, click on the name of your load balancer in the “Network → Load Balancers” section of the dashboard.
Test your load balancer.
Use the load balancer floating IP to reach the nginx servers. The traffic will be managed by the load balancer following the algorithm ROUND_ROBIN.

Important
Follow the instructions on how to setup your cloud environment at Command Line Interface.
Install the Octavia service plugin
pip install python-octaviaclient.
Create a load balancer:
openstack loadbalancer create --name <loadbalancer_name> --vip-subnet-id <subnet_id>The <subnet_id> can be found through the Horizon Dashboard. On the main menu, select the “Network → Networks” tab. Then, click on your network and select the “Subnets” tab. Finally, click on the desired subnet. This information can also be gathered using the CLI.
Important
Wait until the creation of the load balancer is completed. It will take a while and the next steps will return an error if the load balancer is not available.
Create a listener:
openstack loadbalancer listener create --name <listener_name> --protocol HTTP --protocol-port 80 <loadbalancer_name>Note
When using TCP-based listeners (e.g. for SSH), idle (inactive) connections may be automatically closed after a period of inactivity depending on the load balancer configuration. This is expected behavior and does not indicate a failure.
The timeout can be adjusted via the client_data_timeout parameter of the listener. Alternatively, enabling keepalive on the client side (e.g.
ServerAliveIntervalin SSH) can help maintain long-lived sessions.Create a pool:
openstack loadbalancer pool create --name <pool_name> --lb-algorithm <algorithm_e.g.ROUND_ROBIN> --listener <listener_name> --protocol HTTPAdd members to the pools:
openstack loadbalancer member create --subnet-id <subnet_id> --address <ip_vm_1> --protocol-port 80 <pool_name>openstack loadbalancer member create --subnet-id <subnet_id> --address <ip_vm_2> --protocol-port 80 <pool_name>You can find the IPs of the VMs in the “Compute → Instances” section of the lateral menu of Horizon Dashboard. The IPs can also be gathered using the CLI.
Associate a floating IP to the load balancer:
openstack floating ip set --port <port_id> <floating_ip>You can find the <port_id> if you navigate to the description of your load balancer on the Horizon Dashboard. Select the “Network → Load Balancers” section on the left-hand menu of the dashboard. Then, click on your load balancer and go to the “Overview” tab. You can also use the CLI to identify the value of the <port_id>.
Test your load balancer.
Finally, use this floating IP to reach the nginx servers. The traffic will be managed by the load balancer following the algorithm <algorithm_e.g. ROUND_ROBIN>.